From Medan Street Eats to National Palate: The Origin Story
Founded in Medan in 2013 as an Instagram photo diary of local hawker stalls, Lensa Kuliner quickly grew into a trusted voice for Indonesia’s ever-widening foodie community. Its early success came from vivid, close-up shots of nasi padang, lontong sayur, and other comfort foods that resonated well beyond North Sumatra. By the mid-2010s the brand had migrated to a dedicated website—LensaKuliner.com—where longer, bilingual reviews paired with professional-grade photography deepened the storytelling. Today, the project has matured into a full-scale digital publication that covers everything from hidden-gem warung in Jakarta to seaside cafés in Lombok, all while retaining its original heart: celebrating honest, affordable food and the people who cook it.
Navigating the Site: Reviews, Recipes, and Regional Guides
LensaKuliner.com is laid out like a virtual food market, with clearly labelled aisles so readers can find what they crave. “Review Tempat Makan” lists cafés, street-food carts, and all-you-can-eat buffets, each tagged by city and price range. “Kuliner Nusantara” maps local specialties region by region—helpful for travellers who want to plan their next bite before booking a ticket—while the newer “Resep Rumahan” section breaks down classic dishes such as ifumie ayam into step-by-step, weekend-friendly tutorials. A persistent search bar and responsive mobile design make the site feel lightweight even on slower Indonesian data plans, and every article ends with practical tips: operating hours, Google Maps pins, and halal status where relevant.
Empowering Small Vendors Through Digital Storytelling
Beyond restaurant rankings, Lensa Kuliner acts as a microphone for micro-entrepreneurs. Many featured stalls operate on shoestring budgets, yet a single post can generate queues that wrap around the block. The editors practice what they call “ethical tasting”—paying for all meals and disclosing collaborations—so reviews read less like ads and more like neighborhood gossip with journalistic rigor. Vendors report revenue jumps of 20-40 percent within weeks of publication, underlining how digital visibility can level the culinary playing field. Stories also spotlight heritage recipes at risk of disappearing, preserving oral histories in searchable form and nudging younger cooks to continue family legacies.
Riding the Wave of Culinary Tourism in Indonesia
Indonesia’s Ministry of Tourism projects domestic culinary trips to surpass 500 million by 2026, and Lensa Kuliner positions itself at the intersection of that boom. City guides double as weekend itineraries, encouraging readers to spread their spending across multiple vendors rather than crowding a single viral spot. The site’s bilingual (Bahasa and English) approach captures both local eaters and inbound travelers who are scheduling “nibbling tours” between temples and beaches. Articles weave in cultural context—how West Sumatra’s volcanic soil shapes chili heat, or why Balinese lawar is traditionally prepared communally—inviting visitors to taste with respect, not just curiosity.
Social Media Synergy: TikTok, Instagram, and Viral Bites
While long-form posts anchor the brand, real-time engagement happens on social platforms. The TikTok account (@lensakuliner) mixes slow-motion cheese pulls with punch-line price reveals, racking up millions of views and funnelling traffic back to the site. Over on Instagram, 293 000+ followers scroll through carousel reviews and 15-second “slurp tests.” Short-video popularity influences editorial direction; a trending lontong sayur clip can prompt a deeper analytical story about coconut-milk inflation or street-vendor licensing. This feedback loop keeps the platform fresh and ensures that web articles answer the exact questions audiences are already asking in comment sections.
SEO and Content Strategy: What Makes Lensa Kuliner Stand Out
Technically, LensaKuliner.com is optimized for both Indonesian and international search queries. Titles balance local keywords (“Sate Legendaris di Purnawarman”) with descriptive English slugs, and alt-text on images is meticulously filled in—crucial for food content, where half the appeal is visual. The editorial calendar aligns posts with national holidays like Ramadan and Independence Day, periods when search interest for special-occasion dishes spikes. Evergreen guides (e.g., “Jakarta 24-Hour Eats”) are refreshed quarterly to maintain ranking authority. Backlinks flow naturally from travel bloggers and news outlets that embed Lensa Kuliner recommendations in “best of” lists, creating a virtuous circle of credibility.
Future Horizons: Sustainability, Community, and Expansion
Looking ahead, Lensa Kuliner plans to pilot a “green plate” label that highlights vendors using biodegradable packaging or sourcing hyper-local ingredients. A forthcoming podcast will let hawkers tell their own stories in their own dialects, capturing the soundscape—clanging woks, clinking glasses—that photos alone can’t convey. There is also talk of launching an English-language sister site to cater to the growing number of food-driven tourists from Australia and Europe. Whatever shape the project takes, its mission will remain constant: to document Indonesia’s dazzling culinary diversity and to prove that the best way to understand a culture is still, and always, to taste it—one spoonful at a time.
Community Engagement and Food Events
LensaKuliner.com doesn’t only exist online—it’s also known for curating real-world culinary experiences. The platform regularly partners with local municipalities and tourism boards to host food festivals, street food bazaars, and cooking competitions. These events help strengthen relationships between vendors and customers, offering the public an opportunity to meet the faces behind their favorite dishes.
Workshops are also part of the Lensa Kuliner agenda. From food photography and styling to content writing for culinary businesses, these workshops empower aspiring food bloggers and micro-entrepreneurs to establish their own digital presence. The Lensa Kuliner team emphasizes inclusivity, ensuring that small vendors, even those without internet access or digital literacy, are represented fairly and effectively.
By building a community that stretches beyond screens, Lensa Kuliner reinforces its role not just as a content platform, but as a driver of grassroots culinary culture.
Final Thoughts: A Digital Gateway to Indonesia’s Culinary Heart
LensaKuliner.com is more than a website—it’s a movement. It connects people to their heritage, introduces travelers to the true taste of Indonesia, and helps small businesses survive and thrive in an increasingly competitive world. Through its compelling storytelling, practical guides, and ethical approach, Lensa Kuliner shows how food can be both a delicious journey and a powerful tool for cultural preservation and economic empowerment.
As culinary tourism continues to grow and digital media shapes the way we eat, Lensa Kuliner remains at the forefront—an honest, flavorful, and beautifully photographed guide to what’s cooking across the archipelago.
EatingWell: Hearty breakfast skillet comes together in one pan
Updated
Boost your veggie count for the day.
Carolyn Hodges/TNS
One skillet is all you need to create this satisfying, veggie-loaded breakfast (or dinner) dish. This skillet is packed with mushrooms, bell pepper and chard to help up your veggie count for the day and is topped with bacon, eggs, cheese, pico de gallo and fresh cilantro.
Southwest Breakfast Skillet
Serves 4
Active Time: 35 minutes
Total Time: 35 minutes
4 strips center-cut low-sodium bacon (4 ounces)
12 ounces Yukon Gold or red potatoes, scrubbed and cut into 1/2-inch pieces
1. Cook bacon in a large nonstick skillet over medium heat, flipping once, until crispy, 5 to 7 minutes. Transfer the bacon to a paper-towel-lined plate. Pour off all but 2 teaspoons of the bacon fat.
2. Return the pan to medium heat. Add potatoes and cook, stirring often, for 2 minutes. Add water; cover and steam for 5 minutes, stirring once halfway through. Add mushrooms, bell pepper, onion, and 1/8 teaspoon each salt and pepper; cook, stirring occasionally, until the vegetables are tender, about 5 minutes. Stir in chard and garlic; cook until the chard is tender and wilted, about 2 minutes more. Crumble the bacon and stir into the mixture.
3. Spread the mixture evenly in the pan. Using the back of a wooden spoon, make 4 indentations. Crack 1 egg into each indentation. Season with the remaining 1/8 teaspoon each salt and pepper. Cover and cook until the egg whites are set, about 5 minutes.
4. Remove from heat and top with cheese, cilantro and salsa (or pico de gallo).
Tasty tip: Cracking each egg into a small bowl before adding to the skillet makes it easier to remove any unwanted shell.
(EatingWell is a magazine and website devoted to healthy eating as a way of life. Online at www.eatingwell.com.)
The Kitchn: Brown sugar cornmeal waffles transport me back to my grandmother’s kitchen
Updated
Homemade waffles get an upgrade with light brown sugar and yellow cornmeal.
Ghazalle Badiozamani/TNS
Over the years, there have been varying stories about the origins of chicken and waffles. Many believe that the infamous duo made its debut in the 1930s at the Harlem-based restaurant Wells Supper Club. For me, however, my love for the dish began in the late ’90s, and it is one that has made a lasting impact on the way I view food.
I can still remember my first time tasting a cornmeal waffle covered in a blanket of butter and syrup. I was sitting at the end of my grandmother’s kitchen table, enjoying the soulful noise coming through her record player, when she introduced the distinct blend of sweet and savory flavors married into a delicious waffle. At that moment, I’d found a dish that I knew I’d find comfort in for years to come.
I was born and raised in Georgia, where I could find a Waffle House on just about any corner. With its cheap prices and easy accessibility, one can understand how such strong affinity has been built up for the brand. I myself am a person who enjoys their fair share of Waffle House on any given day of the week, but sometimes, making waffles at home just feels and tastes so much better.
Whether I’m enjoying them for breakfast, brunch, or, in some cases, dinner, waffles have been a favorite recipe of mine to play around with. As of late, these brown sugar cornmeal waffles have become my favorite version of the classic dish because they remind me of time I spent with my grandmother when I was a kid. Brown sugar provides the waffles with a caramel-like sweetness that reduces the amount of syrup you’ll need to drizzle on top. And the cornmeal gives it both a nice crunch and toasty flavor. But the best part? They’re easy to make and are perfect for any occasion.
Brown Sugar Cornmeal Waffles Recipe
Makes 7 to 8 (about 7-inch) thin waffles
8 tablespoons (1 stick) unsalted butter
1 1/4 cups all-purpose flour
3/4 cup finely ground yellow cornmeal
1/2 cup whole buttermilk
2 large eggs
2 tablespoons packed light brown sugar
2 teaspoons vanilla extract
2 teaspoons baking soda
1 teaspoon baking powder
3/4 teaspoon kosher salt
Cooking spray
Fresh berries, for serving (optional)
1. Cut 1 stick unsalted butter into a few pieces, place in a small microwave-safe bowl, and microwave on high until melted, 40 to 60 seconds. (Alternatively, melt on the stovetop over low heat.) Set aside to cool slightly while you heat a waffle iron for medium heat.
2. Place the melted butter, 1 1/4 cups all-purpose flour, 3/4 cup finely ground yellow cornmeal, 1/2 cup whole buttermilk, 2 large eggs, 2 tablespoons packed light brown sugar, 2 teaspoons vanilla extract, 2 teaspoons baking soda, 1 teaspoon baking powder, and 3/4 teaspoon kosher salt in a large bowl and whisk until combined; the batter will be quite thick.
3. When the waffle iron is ready, coat with cooking spray, then pour in the amount of batter recommended by the manufacturer, about 1/2 cup for a (7-inch) thin round waffle. Close the lid and cook until the waffle is golden-brown. When the waffle is ready, remove from the iron to a wire rack.
4. If not serving immediately as they are made, place directly on a rack in a 200 F oven to keep warm. Repeat making waffles with the remaining batter. Serve with fresh berries.
Recipe notes: The waffles can be refrigerated in an airtight container for up to five days or frozen for up to two months. Reheat directly on a rack in a 350 F oven until heated through, 4 to 6 minutes if refrigerated, or 10 to 12 minutes if frozen.
(Choya Johnson is a contributor to TheKitchn.com, a nationally known blog for people who love food and home cooking. Submit any comments or questions to editorial@thekitchn.com.)
EatingWell: Enjoy this potato ‘pancake’ at breakfast, lunch or dinner
Updated
Cut into wedges to serve.
Blaine Moats/TNS
Preshredded potatoes for the rösti are the key to making this crisp pancake quickly. Top with fried eggs and a salad and it becomes a meal.
Asparagus & Potato Rösti
Serves 4
Active Time: 10 minutes
Total Time: 30 minutes
3 tablespoons extra-virgin olive oil, divided
8 ounces asparagus, trimmed and cut into 2-inch pieces
1/2 teaspoon salt, divided
1 tablespoon butter
1 pound frozen shredded potatoes
1. Heat 1 tablespoon oil in a medium nonstick skillet over medium heat. Add asparagus and 1/4 teaspoon salt. Cook, stirring, until tender, about 3 minutes. Add butter and potatoes; stir to combine. Press the mixture gently into a single layer. Cook until crispy on one side, about 10 minutes.
2. Slide the rösti onto a clean plate. Drizzle the top with the remaining 2 tablespoons oil, then invert into the pan so the crispy side is up. Cook until crispy on the other side, 8 to 10 minutes more. Slide onto a serving plate and sprinkle with the remaining 1/4 teaspoon salt. Cut into 6 wedges.
(EatingWell is a magazine and website devoted to healthy eating as a way of life. Online at www.eatingwell.com.)
Seriously Simple: Surprise your mom with these light and fruity ricotta pancakes
Updated
Whether you call these flapjacks, hot cakes or griddle cakes, they are part of a sunny meal on a special day.
Courtesy California Wine Institute/TNS
Brunch is my favorite meal on Mother’s Day. It’s the day we can leisurely sit around the table, relax and just enjoy the moment. This year I’m making these delectable pancakes for my daughter, husband and our new grandson. I can’t wait to see his face when he tries them.
Whether you call these flapjacks, hot cakes or griddle cakes, they are part of a sunny meal on a special day. These heavenly fluffy hot cakes are lightened up by incorporating ricotta cheese and whipped egg whites into the batter. I enjoyed making all sorts of pancakes when my daughter was young. And now I can make them for the next generation.
These sophisticated pancakes include creamy ricotta that creates an airy sweetness, while the addition of whipped egg whites folded into the batter produces a moist and light result. I like the addition of orange zest for a touch of citrus. Some crisp bacon or sausage is all you need to make this an unforgettable Mother’s Day. For brunch, accompany these pancakes with a crisp, fruity Johannesburg riesling, a spicy gewürztraminer or Champagne.
Pancakes skills that will make you a pro
Combine the dry ingredients with the wet ingredients until they are just blended. Working the batter for too long will cause the pancakes to be tough.
Use a large non-stick skillet or flat griddle.
Heat the pan and then add the butter to it. Make sure there is not too much butter, or the pancakes will be oily.
Use a measuring cup with a spout or a ladle to avoid spilling.
Pour the batter slowly, as it will spread.
Cook the first side until tiny bubbles appear across the pancake. Flip the pancakes and cook until golden brown on both sides.
Ricotta Pancakes with Roasted Blueberry Sauce
Serves 4
For the blueberry compote:
18 ounces fresh blueberries, cleaned
2 tablespoons brown sugar
2 tablespoons unsalted butter, cut into small pieces
1 teaspoon orange zest
1/4 teaspoon ground cloves
1/4 teaspoon cinnamon
For the pancakes:
4 large eggs, separated
1 cup low-fat ricotta cheese
2 tablespoons sugar
1 tablespoon finely chopped orange zest
1/2 cup all-purpose flour
Pinch of salt
4 tablespoons unsalted butter (for cooking the pancakes)
For the blueberry topping:
1. Preheat the oven to 375 F.
2 Place the blueberries in a medium baking dish. Sprinkle the brown sugar, butter, orange zest and spices over the blueberries and mix to combine. Roast until the blueberries begin to burst, and the juice is syrupy, about 20 minutes. If they overcook, they will break down and turn into syrup with little texture so be careful.
3. Let cool for about 10 minutes. Meanwhile make the pancakes.
For the pancakes:
1. Combine the egg yolks, ricotta, sugar, orange zest and flour in a medium bowl and whisk until well combined.
2. In a large bowl with an electric mixer combine the egg whites and a pinch of salt and beat on medium speed until the egg whites are stiff but not dry.
3. Add one third of the egg whites to the pancake mixture and fold them in gently. Fold in the remaining egg whites, making sure no white streaks are left in the batter.
To cook and serve the pancakes:
1. Heat 2 tablespoons of the butter in a large griddle or saute pan over medium heat. Pour in about 1/4 cup batter for each pancake and cook for about 2 to 3 minutes on each side or until lightly browned. Add more butter as necessary.
2. Serve the pancakes immediately with a large spoonful of roasted blueberry topping. You can also serve these with some warm maple syrup if you like.
Make ahead: Make the blueberry topping up to one day ahead, cover and refrigerate. Reheat gently before serving.
(Diane Rossen Worthington is an authority on new American cooking. She is the author of 18 cookbooks, including “Seriously Simple Parties,” and a James Beard Award-winning radio show host. You can contact her at www.seriouslysimple.com.)
5 recipes to usher in spring brunch season
Updated
After a winter of heavy dishes, it’s time to lighten things up with herb-filled quiches, frittatas and citrus.
Since Mother Nature missed the memo that spring has arrived, it’s time to take matters into our own hands. And there’s no better place to usher in a new season than the kitchen.
Bid a fond farewell to the heavy stews and sauce-laden comfort food that got us through a trying winter. We need to lighten up.
Easter was just the first occasion of a spring filled with special occasions — bridal showers, Mother’s Day, graduations — and brunch is one of our favorite ways to celebrate. While we always have our go-to dishes (is it even a brunch without ham?), we’re also ready to try something new.
Fresh herbs take center stage in frittatas and quiches, while peas and asparagus remain a match made in culinary heaven. Both kids and adults will enjoy vegetable-filled egg bites, which you can and should tailor to your own tastes, and adding bacon to deviled eggs will make them fly off the plate even faster than usual. Because we’re not quite ready to entirely do away with comfort food, start the morning out with orange-kissed sweet rolls that appeal to our nostalgic side, but without the stress of working with yeast dough. We’re feeling better already.
Add bright-colored napkins and a bouquet of tulips, daffodils or daisies, and it’s officially spring. If not outside, at least in your kitchen.
CRAB AND BOURSIN CHEESE QUICHE
Serves 6.
In “For the Love of Seafood” (Countryman, 2023), author Karista Bennett writes: “Over the years, I’ve developed a lot of quiche recipes. My preferred ratio for a creamy quiche custard is four eggs to 1 3/4 cups heavy cream, using a deep-dish pie plate (about 2 inches deep). If the pie plate is a standard pie plate (1 1/2 inches deep), reduce the heavy cream to 1 1/2 cups. It’ll still be delicious!” Feel free to substitute your own pie crust recipe, or a store-bought one if time is of the essence.
For the pie crust:
1 1/2 cups all-purpose flour, plus more for dusting
1 teaspoon salt
6 tablespoons unsalted butter, cold, cut into cubes
1/3 cup ice-cold water
For the quiche filling:
6 ounces crabmeat
1 (5.2-ounce) pkg. garlic and fine herb boursin cheese
1 tablespoons chopped fresh chives, plus more for garnish
4 large eggs
1 3/4 cups heavy cream
1 teaspoon salt
1/2 teaspoon freshly ground black pepper
Directions
To prepare the pie crust: Combine the flour, salt and butter in a food processor and pulse until it forms crumbles. Then, while pulsing, add the cold water and pulse until the dough comes together. It’ll be a bit shaggy. Roll out the dough on a floured surface and form a 10- to 11-inch disk. Cover with plastic wrap and refrigerate for at least an hour.
Preheat the oven to 350 degrees Fahrenheit.
Roll out the chilled dough on a floured surface, to about a 12-inch round that is 1/8 inch thick. Fold the dough in half and place it in a 9-inch deep-dish pie plate, placing the fold in the center and then unfolding the dough. Press the dough down into the pie plate, trim the edges, and then pinch to form a pretty edge.
To prepare the quiche filling: Squeeze out all the excess liquid from the crab and dry with a paper towel. Then, layer into the bottom of the pie crust. Next, layer the boursin cheese over the crab and sprinkle with the chopped chives.
In a medium bowl, whisk together the eggs, heavy cream, salt and pepper and then pour it over the crab and cheese. Put the pie plate on a baking sheet and place it in the oven. Bake for about 45 minutes, or until the center is set. If needed, place a piece of parchment over the quiche to keep the crust from getting too brown.
Once the quiche is done, remove from the oven, garnish with additional chives and let sit for about 10 minutes. Serve warm or at room temperature.
HERB FRITTATA
Serves 8.
The basic difference between an omelet and a frittata is the latter is cooked slowly over low heat — sometimes even baked in the oven — while an omelet is cooked quickly over medium or medium-high heat. Omelets are usually served immediately so they retain their heat, while frittatas are often served at room temperature. This is a great dish to make ahead for brunch. From “Italy on a Plate,” by Susan Gravely (Vietri Publishing, 2023).
4 small red potatoes
10 eggs
1 1/4 cups mixed finely chopped herbs, such as dandelion greens, thyme, basil, oregano or Italian parsley, plus more for garnish
1/4 cup grated Parmigiano-Reggiano cheese
1/4 cup finely chopped onion
1/2 teaspoon salt
1/4 teaspoon black pepper
1/4 cup olive oil, or more as needed to cover the bottom of the pan
Seasonal edible flowers, for optional garnish
Directions
Place the potatoes in a small pot and cover with water. Bring to a boil over medium-high heat and cook for 10 minutes until fork-tender. Drain and set aside to cool.
In a medium bowl, beat the eggs with a fork. Add the chopped herbs, cheese, onion, salt and pepper and stir to combine.
Cut the cooled potatoes into 1-inch chunks. Add to eggs and stir gently to combine.
Heat the oil in a large skillet over medium heat, making sure there is enough oil to just cover the entire bottom of the pan. Add the egg mixture and cook 4 to 5 minutes until the frittata thickens. Use a spatula to loosen around the edge. If you are good at flipping frittatas, turn the frittata over onto the other side and let cook for another 3 to 4 minutes until set. If not, you can finish using the oven broiler, cooking 3 to 4 minutes until the eggs are set.
Place the frittata on a serving plate or wooden cutting board and cut into wedges. Garnish the center with a bunch of herbs and seasonal flowers.
MASALA EGG BITES
Serves 6.
These fluffy mini frittatas or egg muffins are spiced with a simple combination of ginger, green chile and turmeric to take the ubiquitous coffee-chain egg bites up a notch and are a fun addition to any brunch spread (or breakfast on the go). Mix up the toppings as you like — use spinach, roasted red pepper, goat cheese, or any other veggies or cheeses you like. If you don’t have a mini-muffin pan, use a regular muffin pan and increase the baking time by 5 minutes. From “The Vegetarian Reset,” by Vasudha Viswanath (Collective, 2023).
4 eggs
1/2 cup full-fat cottage cheese
1/2 cup shredded Cheddar cheese
1/2 cup diced red bell pepper
2 tablespoons diced onion
2 tablespoons chopped cilantro
1 jalapeño pepper or Thai chile, chopped
1 teaspoon grated ginger
1/2 teaspoon ground turmeric
1/4 teaspoon salt
Directions
Preheat the oven to 350 degrees. Lightly grease a 24-cup mini-muffin pan with nonstick spray.
Combine the eggs, cottage cheese and Cheddar cheese in a blender or food processor and blend until smooth. The mixture will be the consistency of heavy cream. Add the red pepper, onion, cilantro, chiles, ginger, turmeric and salt to the blender and pulse a couple of times until evenly distributed (don’t blend the toppings smooth, just distribute them evenly throughout the mixture).
Pour the mixture into the prepared mini-muffin pan, filling each muffin cup no more than two-thirds full. Bake for 15 minutes, or until golden brown on top. Let cool in the pan (they will deflate a bit). Remove from the pan and serve.
To make ahead: Bake as directed and store in an airtight container in the refrigerator for up to 4 days. Reheat for 20 seconds in the microwave. To freeze, wrap them individually in plastic wrap to prevent them from sticking together, and freeze for up to 1 month.
WHIPPED RICOTTA WITH PEAS AND ASPARAGUS
Serves 4.
This pretty salad works beautifully as a starter, arranged on individual plates, but is equally stunning on a platter served family-style. Whipping the ricotta gives it a smoother, lighter and creamier texture. You can also use half feta or rindless goat cheese if you prefer a bolder, saltier flavor. From “LEON Big Salads,” by Rebecca Seal (Conran, 2023).
1 1/4 cups ricotta
2 tablespoons extra-virgin olive oil, plus more for serving
1 tablespoon milk
Pinch of salt and freshly ground black pepper, plus extra for serving
2 teaspoons finely chopped flat-leaf parsley
2 tablespoons finely chopped chives
Olive oil, for cooking
20 asparagus spears, trimmed
1/2 cup frozen peas
Handful of pea shoots or arugula
Parmesan cheese, grated, for garnish
Leaves from a sprig of fresh mint, torn if large
Freshly squeezed lemon juice, to serve
Directions
Place the ricotta, extra-virgin olive oil and milk into the bowl of a blender or small food processor and blitz until smooth and creamy. (You can also whisk by hand.) Stir in the salt, pepper, parsley and chives.
Heat a little olive oil in a large frying pan over medium heat and add the asparagus and the peas. Sauté for a couple of minutes until the asparagus just begins to brown, shuffling it all around in the pan. Remove from the heat.
Divide the whipped ricotta mixture between four starter plates and use the back of a spoon to spread it out over the plate. Arrange the asparagus on top and scatter over the peas, then finish with the pea shoots or arugula, plus the Parmesan, mint, a generous squeeze of lemon juice, a drizzle of extra-virgin olive oil and final twist of salt and pepper. Serve.
ORANGE ROLLS
Makes 8 rolls.
Inspired by orange roll recipes from the 1910s and ’20s, these citrusy cinnamon rolls have an old-fashioned feel. Perfumed with fresh orange zest in the base, filling and glaze, they come together in less than an hour, thanks to a fluffy, tender dough that doesn’t require yeast. To help the biscuit-dough base end up as soft as any yeasted treat, cream cheese and extra milk are mixed into the dry ingredients. But the most important part of these rolls is the fresh orange zest, plump with fragrant, flavorful citrus oils. From the New York Times’ Genevieve Ko.
For the dough:
1/3 cup packed light brown sugar
1 orange
1 2/3 cups all-purpose flour, plus more for rolling
1 3/4 teaspoons baking powder
1/4 teaspoon fine salt
3 tablespoons cold unsalted butter, cut into small pieces, plus softened butter for the pan
2 tablespoons cold cream cheese
2/3 cup whole milk or half-and-half
For the filling:
1/2 teaspoon ground cinnamon or a combination of cinnamon and cardamom
2 tablespoons unsalted butter, very soft
For the (optional) glaze:
1/4 cup cream cheese, room temperature
3 tablespoons powdered sugar, or to taste
1 orange
Directions
To prepare the dough: Preheat oven to 375 degrees. Place the brown sugar in a small bowl and zest the orange directly over it. Gently rub the zest into the sugar and transfer 2 tablespoons to a large bowl to use for the dough. Save the rest of the orange sugar for the filling.
Add the flour, baking powder and salt to the large bowl and whisk well. Add the butter and cream cheese, and smash and rub them into the dry ingredients with your fingertips until they’re fully incorporated and the mixture resembles crumbs.
Add the milk all at once and stir gently with a fork until the dough comes together and no dry bits remain. Freeze while you prepare the pan and filling. Very generously butter the bottom and sides of an 8-inch round cake pan or ovenproof skillet.
To prepare the filling: Mix the cinnamon (and cardamom, if using) into the reserved orange sugar.
Scrape the dough onto a well-floured work surface. Use a floured rolling pin to roll the dough or flour your hands to pat the dough into a 12-by-5-inch rectangle. It may be sticky, but that’s OK. Just flour the dough enough to be able to shape it.
To fill the dough, spread the very soft butter evenly over the surface, then sprinkle the orange sugar on top. Starting with one long side of the dough, roll it up into a 12-inch-long log. If it’s stuck to the surface, scrape it up as you roll it, using a bench scraper or stiff spatula.
Use a serrated knife to cut the log with a sawing motion into 8 (1 1/2-inch-thick) slices. Place a slice in the center of the pan, then space the remaining slices 1/2-inch apart around it. At this point, the rolls can be covered and chilled for up to 2 days before baking directly from the refrigerator.
Bake until golden on top, 23 to 25 minutes. You don’t want to overbake, but also want the dough to be cooked through. When you press the top, the roll shouldn’t sink but spring back just a little.
To prepare the glaze: While the rolls are baking, place the cream cheese and the powdered sugar in a bowl. Zest the orange directly over the sugar, then mix and smush together until smooth. Squeeze in 2 tablespoons orange juice and mix well. The glaze should be a bit thick because it will loosen when it hits the hot rolls. Taste and add more powdered sugar if you’d like. Stir in more juice if it’s too stiff.
Let the rolls cool for 5 minutes in the pan, then spread the glaze all over them. Cool a bit longer to serve hot or warm.
We may earn commission from links on this page, but we only recommend products we back.
1
The King and Queen Consort’s Coronation Quiche
Buckingham Palace
King Charles and Queen Camilla shared this “coronation quiche” recipe, described as “a deep quiche with a crisp, light pastry case and delicate flavours of Spinach, Broad Beans and fresh Tarragon. Eat hot or cold with a green salad and boiled new potatoes—perfect for a Coronation Big Lunch!”
“Aubergines often feature as a side dish when served at a table for dinner, but not here. We are taking this delicious aubergine, coating it with flavour, frying till tender and then drizzling over the simplest coronation dressing. It’s like dinner at my mum’s collided with my lunches at school to create this beauty,” Nadiya Hussain, winner of Great British Bake Off, writes in Nadiya’s Fast Flavours.
What’s a more English dessert than a trifle? Adam Handling, a Michelin-starred chef and owner, created this strawberry and ginger trifle especially for the coronation.
In 2020, Clarence House—which represented then-Prince Charles and Camilla, Duchess of Cornwall—shared that one of Charles’s favorite cheesy baked eggs. “One thing that undoubtedly brings many of us great comfort is good food,” Charles said, calling British cheese “one of the most wonderful joys in life.” It’s a perfect breakfast for watching the coronation.
Get the recipe
5
The Dorchester’s Sovereign Martini
Tim Graham//Getty Images
King Charles’s favorite drink is reportedly a martini. To celebrate the coronation, British hotel the Dorchester will be serving the “Sovereign Martini”–made of Wessex gin, Royal Garden mead, dry vermouth, lavender bitter and orange scent—at their Vesper Bar.
If you’re not in London, however, you can totally make your own martini at home:
26 Martini recipes
6
Royal Sipsmith Martini
Sipsmith
British gin brand Sipsmith also released a special coronation martini, called, naturally, the “Royal Sipsmith Martini.” It’s very easy to make:
The recipe:
Ingredients
Method:
Fill a mixing glass with ice
Add the vermouth and stir for a few seconds
Add the gin to the mixing glass and stir briskly for 50 turns
Strain into a chilled glass and spritz with the zest of a lemon peel
Now 26{d2b09b03d44633acb673e8080360919f91e60962656af8ade0305d5d8b7e4889} Off
If you want to pop some bubbly for the coronation, why not turn to English sparkling wine? British brand Nyetimber released this limited edition bottle of their Classic Cuvee MV, a blend of Chardonnay, Pinot Noir, and Pinot Meunier from West Sussex. The bottle was inspired by royal garments and uniforms. All you have to do is pour it into some champagne glasses, and enjoy.
William Greenberg Desserts makes some of T&C‘s favorite sweets, including an iconic black-and-white cookie. But the New York City staple is going international for King Charles’s coronation with these delicious butter shortbread cookies, topped with an icing crown in honor of King Charles III. They’re great on their own or dunked into a mug of coronation tea, but if you want to add these treats to your table, act fast; they’re baked daily and when they’re gone for that day, they’re gone. To reserve in advance, call 212-861-1340.
Advertisement – Continue Reading Below
10
Woodford Reserve’s High Tea with the King
Courtesy Woodford Reserve
The coronation is taking place on the same day as the Kentucky Derby, so why not celebrate both with this cocktail, which is a blend of Early Grey infused simple syrup and Woodford Reserved Bourbon. As the brand notes, “travel your tastebuds from London to Louisville.”
The recipe:
1 oz brown butter fat washed Woodford Reserve Bourbon
1 oz Woodford Reserve Rye
1/4 oz Earl Gray Rich Simple Syrup
2.5 mL Woodford Reserve Sorghum & Sassafras bitters
Brown butter fat wash: Melt 1 stick of butter in a small saucepan over low heat. Stir constantly and observe until milk solids brown and there is a distinctly nutty aroma. Pour directly into 2 cups of Woodford Reserve Bourbon. Allow to infuse overnight in the fridge. Strain off after a minimum of 10 hours.
Earl Gray Syrup: Brew very strong Earl Gray tea. I used 2 teabags for 200g of hot water. Add 400g of white granulated sugar to the brewed tea. Stir until dissolved. (This is a 2:1 rich simple syrup.)
11
Old Forester’s The Crown Julep
Courtesy Old Forester
Another Kentucky Derby x Coronation mash-up comes in the form of this “Crown Julep” drink from Old Forester.
The recipe:
*To create syrup, use a 1:1 ratio of demerara sugar to Earl Grey tea brew.
Directions: Add the Earl Grey syrup and mint leaves to a Julep cup and gently muddle together. Add a heaping scoop of crushed ice to the cup, followed by 2 oz. Old Forester & 1 oz. Pimm’s. Gently stir and then garnish with a bunch of fresh mint.
Advertisement – Continue Reading Below
14
The Victoria Sponge
WPA Pool//Getty Images
Queen Victoria regularly ate a slice of sponge cake with her tea. As King Charles III is the first monarch to be descended from Victoria on both sides, honoring the British queen just makes sense. Buckingham Palace Pastry Chefs shared the recipe for the “Victoria Sponge” a few years ago for Royal Garden parties, and it feels right to make it for the coronation.
Camilla, then the Duchess of Cornwall, is given a Victoria Sponge by head chef Sue Hayes during her visit to the The Fair Close Centre on March 22, 2018.
15
Royal Salute Royal Salute The Coronation of King Charles III Edition Scotch Whisky
15
Royal Salute Royal Salute The Coronation of King Charles III Edition Scotch Whisky
Emily Burack (she/her) is the news writer for Town & Country, where she covers entertainment, culture, the royals, and a range of other subjects. Before joining T&C, she was the deputy managing editor at Hey Alma, a Jewish culture site. Follow her @emburack on Twitter and Instagram.
There are cocktail bars today that seem almost church-like — hallowed spaces where the faithful come to taste and engage in acts of exegesis, analyzing every nuance and extolling how spirit and bitters come together in the glass.
The margarita is not a drink of such bars.
Like most cocktails, the margarita — a combination of tequila, lime and triple sec that has been around since at least the 1930s, with a roster of claimants to its invention — has been endlessly upgraded and complicated by the modern craft cocktail movement. And there are serious and sublime agave spirit bars, in Mexico and domestically, that treat agave spirits, tequila and especially mezcal, as the complex and varied spirits they are.
Still, the vast volume of margaritas is still shaken up and slurped down at countless summer parties, mid-tier bars and Mexican restaurants, places with sunny patios and bottomless baskets of chips and salsa. The blender whirs, the sour mix splooshes and Roberto’s your tío. The deepest contemplation you’ll be doing is wondering how you’re going to get that guacamole stain out of your T-shirt.
But in New Orleans recently, I popped into Vals, the gas station-turned-Mexican-restaurant started by the team that runs celebrated cocktail haven Cure, and we got a round of margaritas that reminded me how good the drink can be. Vals’ frozen margarita was perfectly balanced — tart, sweet, the spirit gentle but present in the flavor, complemented by its Tajín chile-lime-salt rim.
As I sipped, I considered the various mediocre-ritas I’ve encountered — the too-diluted, the cloying, those dragged down by the lemon Pledge flavor of bad sour mix or Splitting Headache brand tequila. Of late, though, the most common problem, for me, has arrived in the form of a relative newcomer: the spicy margarita, in which the heat of chiles is added to the classic template.
The spicy marg is a drink that, done well, is everything I want in warmer weather. The tart-sweet-booze balance takes on a new dimension when peppers enter the scene. Incorporated well, they add complementary flavor and a zing of welcome heat. Overdone, you can end up with a stunt drink, the sort of thing base-jumpers would sip as they plunge off skyscrapers, yelling “EXTREME!” into each other’s GoPros.
Inviting chiles to your margarita is like asking a newbie to your longstanding happy hour: Will they get along with your other friends? Will they dominate the conversation? Will they throw their weight around? If a fight occurs, how do you get guacamole out of cotton?
The best way to make a spicy marg mind its manners will depend on just how much of a hothead you are. I’ve had spicy drinks I loved on the first sip, only to be silently suffering and wishing I had ordered differently by the fifth — palate fatigue can be acute with spicy drinks.
I often opt to add heat in tiny touches — as with that spicy/sour Tajín Clásico on the rim of the frozen margarita at Vals, or chile pepper concoctions doled out in drops. I like Bittermens’ Habanero Hellfire Shrub, which is hot and tart; the Smoked Chili bitters from Hella and Fuego bitters from El Guapo are also good pepper-uppers.
There are also chile liqueurs, such as Ancho Reyes’ original Ancho and the Verde, the former sweet and smoky, the latter retaining more of the raw poblano chile’s green vegetal notes. If you’re looking to try out the liqueurs, you can start by working them into a standard margarita template, replacing or supplementing a portion of triple sec.
The above brands are all worth playing with and generally offer consistency of both flavor and heat-level. The danger of the cheapest method — working with fresh chile peppers — is that it can lack that consistency. As any lover of guacamole knows all too well, peppers are mercurial, especially the common jalapeño. You can get one with a modest burn and then the next one will have all the fire of a tax seminar. Serranos are more reliable, and for the basic version of a spicy margarita (recipe below) I generally use a couple of wheels of it, dropping them into the cocktail shaker with the ice.
Along with that basic template, I’ve provided a couple of spicy margarita variations to try: The Tigerita (or Thai-gerita if you’re feeling cute) incorporates coconut, Thai basil and bird’s-eye chiles into the drink, and the Pineapple-Habanero margarita has three heat sources: fresh habanero and ancho chile liqueur in the drink, and Tajín Clásico on the rim of the glass. Both can be a little zippy or nigh nuclear, depending on how much of the angry little peppers you put in the shaker (as written, the recipes are geared toward milder palates).
Here are some basic guidelines for working with fresh chile peppers to create your own perfect spicy margarita.
Know your peppers. Their heat levels are measured in Scoville units, which essentially measure how much capsaicin — the compound in peppers that causes the burn on the tongue — is in the pepper. At 2,000-8,000 Scovilles, the gentle jalapeño quavers before some of the peppers sought by sadomasochistic eaters. Carolina Reapers, currently the hottest known, often measure more than 2 million Scovilles.
Chile peppers vary. The variation in peppers isn’t just heat — the burn is only part of their flavor. Habanero and some other high-heat peppers also have sweet tropical fruit notes. Jalapeño is more vegetal, with some of the same bell pepper flavors that can show up in silver tequilas. And then you have ancho chiles (dried poblanos), which are milder and smoky, which can make their flavor a great pairing with a smoky mezcal or add some interest to a standard silver tequila marg.
Divide and conquer: The hot stuff in peppers is concentrated in the ribs (the paler fibrous structures that surround the seeds) and the coating of the seeds. Including ribs and seeds in the pepper you put in your margarita will make it hotter; trim them off if you want to avoid that boost.
Longer steep, hotter drink. The more time a pepper spends in the mix — especially submerged in alcohol, a natural solvent — the more its flavor and heat will be extracted. In testing drinks, I found that the same amount of chile added to the shaker before the rest of the ingredients, instead of just before shaking, often resulted in a noticeably hotter drink. And if you don’t strain those chile solids out when you pour the drink, it will continue to infuse as you sip.
Practice safe slice. Wear protection — glove up if you’re working with anything much hotter than a jalapeño. It’s amazing how easy it is to chop up some hot peppers, wash your hands and go on your merry way, only to be unpleasantly confronted by their compounds’ staying power when you’re taking out your contact lenses later. (Don’t ask how I know this.)
Scale and get a printer-friendly version of the recipe here.
A bright and balanced margarita with adjustable heat (use jalapeño chiles if you want subtle heat; dial it up to serranos or add more chile if you’d like more zip). Blanco tequila works well here, but if you want a smokier version, go with a mezcal, such as Del Maguey Vida or Ilegal Joven.
Where to Buy: Agave syrup is available at many grocery and liquor stores; substitute simple syrup if you can’t find it. Tajín, a chile-lime seasoning salt, is available at many grocery stores, at Latino markets and online.
1 tablespoon Tajín Clásico Seasoning, or more as needed (optional, for garnish)
1/4 ounce agave syrup, plus more for garnish (optional)
Ice
2 ounces tequila or mezcal
1 1/2 ounces fresh lime juice
1/2 ounce triple sec, such as Cointreau
1 to 4 small slices jalapeño or serrano pepper
Lime wheel or jalapeño slice, for serving (optional)
If using the Tajín, on a small plate, scatter the seasoning. On another small plate, drizzle a circle of the agave syrup the circumference of your rocks glass. Dip the rim of the glass in the syrup, then in the Tajín so the seasoning sticks. (Alternatively, you can swipe a lime wedge around the glass rim before dipping the rim in the spice, but the syrup is more effective in getting the seasoning to stick.)
Add ice to the glass and set it aside.
Fill a cocktail shaker with ice. Add the tequila, lime juice, triple sec, agave syrup and chile slices and shake hard for about 15 seconds. Double-strain into the prepared glass, add a lime wheel or jalapeño slice, if using, and serve.
Scale and get a printer-friendly version of the recipe here.
Think of this spicy margarita riff, with Southeast Asian-inflected flavors and heat, as a Thai-gerita if you prefer. The amount of Thai bird’s-eye chiles you opt to incorporate can make it a gentle or fierce beast. If you can’t find these chiles, you can substitute serranos. The ice can be cubes or one big rock.
Where to Buy: Liber & Co. Toasted Coconut Syrup can be found online, but you can substitute Coco López or Coco Reàl. Thai chiles (often called bird’s-eye chiles) and Thai basil can be found at well-stocked supermarkets and Asian markets.
Ice
6 leaves Thai basil, plus additional for garnish (optional)
2 to 4 slices red Thai chiles, plus additional for garnish (optional)
Pinch of fine salt
2 ounces tequila or mezcal
1 1/4 ounces fresh lime juice
3/4 ounce Liber & Co. Toasted Coconut Syrup
Add a large ice cube to a rocks glass and set aside.
In a cocktail shaker, combine the Thai basil, chile slices and salt, then fill it with ice. Add the tequila or mezcal, lime juice, and coconut syrup. Shake hard, about 15 seconds, then double-strain into the glass. Garnish with basil leaves and a chile slice, if you like, and serve.
Pineapple-Habanero Margarita
Scale and get a printer-friendly version of the recipe here.
For true spice lovers, this spicy, bright and balanced margarita has three heat sources at work: slices of habanero and a dash of ancho chile liqueur in the drink, and chile-lime salt on the rim. We recommend a smoky mezcal, such as Del Maguey Vida, to stick with the fiery theme, but a blanco or reposado tequila will work well, too. Note: You may want to use gloves when slicing the habaneros.
Where to Buy: Ancho Reyes Original chile liqueur and pineapple gomme syrup (Small Hand and Liber & Co. are both good brands) can be found at well-stocked liquor stores and online. Tajín is available at many grocery stores, at Latino markets and online.
1 tablespoon Tajín Clásico Seasoning, or more as needed, for garnish
1 ounce pineapple gomme syrup, plus more for the spice rim
Ice
2 ounces mezcal or tequila
1 ounce fresh lime juice
1/2 ounce Ancho Reyes Original chile liqueur
1 to 2 thin slices habanero chile pepper
On a small plate, scatter the Tajín. On another small plate, drizzle a circle of the pineapple gomme syrup the circumference of your rocks glass. Dip the rim of the glass in the syrup, then in the Tajín, so the seasoning sticks. (Alternatively, you can swipe a lime wedge around the glass rim before dipping the rim in the spice, but the syrup is more effective in getting the seasoning to stick.)
Add ice to the glass and set it aside.
Fill a cocktail shaker with ice. Add the mezcal, lime juice, pineapple syrup, chile liqueur and chile slices. Shake hard for about 15 seconds, then double-strain into the prepared glass and serve.
After a heavy dose of rich food during the Eid holidays, the body craves something simpler. Here are some recipes that you could try after the holiday season.
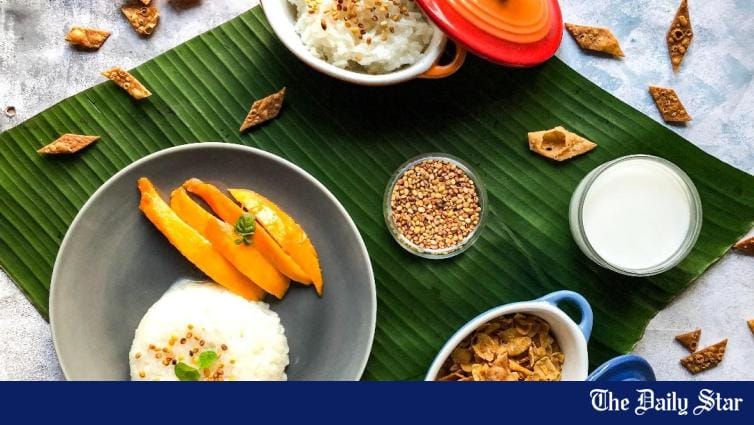
MANGO STICKY RICE
Ingredients ½ cup glutenous rice 1 cup coconut milk ½ cup coconut cream 2 tbsp sugar 1 tsp salt For the topping — Fried lentils (can be altered with toasted sesame seeds) Mango slices, as per need
Method First, cook the glutenous rice properly following the regular method (steaming or in water). Then mix in the salt, sugar, and coconut milk. Cook for another two minutes. Slice up your mangoes and keep them in the refrigerator to be able to serve cold. Once the rice cools down, on a plate, serve the rice, top with coconut cream, and mango slices. Then top with choice of crisps for texture. Add extra coconut cream on the side for extra goodness.
SUSHI BAKE
Ingredients 3 sheets fried nori (regular ones used for sushi) 3 cups cooked glutenous rice 15-17 pieces large prawns, de-veined and cleaned 2 tbsp cream cheese 1½ tbsp mayo 1 tbsp sriracha 1 tsp soy sauce A pinch of black pepper 2 tsp vinegar
Method First, marinate the prawns with soy sauce and pepper, for 10 minutes. Prepare rice by mixing vinegar to the cooked rice. In a bowl, mix the cream cheese, mayo, and sriracha properly. Pour that cheese mix into the prawns and mix well.
Cut the whole large nori sheets into four. Brush hands with oil, then in the nori sheets, place in 1 tablespoon of the cooked rice in the middle of the sheet. Then using your hands, place the rice properly spreading it through the corners, but leave gaps in the corners. Take your muffin mould, brush oil in it. Then, press the nori with rice in them into the mould — they will look like flowers. After that, place in one tbsp of the prawn cheese mix into the rice cups. Bake in pre-heated oven for 18-20 mins at 175° C. Serve topping with spicy mayo/kewpie mayo, and soy sauce dip mixed with wasabi.
STREET STYLE THAI BASIL CHICKEN
Ingredients ½ chicken breast (around 200g) 5 cloves of garlic, if you like it garlicy Red chilli, as per preference 3 tsp soy sauce, light 1½ tsp oyster sauce 1½ tsp sugar (better if adjusted as per taste) 1 tsp soy sauce (dark) Oil Thai basil, as per taste (Fresh mint leaves can also be used, but it will not be basil chicken by name. However, it will not differ much in terms of flavour or taste. Just make sure the mint is fresh)
Method Cut your chicken into bite-sized pieces. Roughly crush together garlic and red chillies.
In a hot pan, add oil. Now, add the crushed garlic and chilli. This is my favourite part of the cooking, for the aroma it sets around. Stir fry that for just about a few seconds until flavours come out, and add in your chicken.
Fry the chicken for about a minute or so, and then pour in your light soy sauce, oyster sauce, sugar, and finally, the dark soy sauce. The reason for using both soy sauces is because of the depth of flavours they add individually and also to hit intricacy right! Stir it all, and cook for about a few minutes. Right during the end, add in your basil, and give it just one stir and get off heat, because we do not want to overcook the leaves.
I highly recommend the dish with steamed rice, and oozing yolky fried egg; the yolk gives a silky texture to rice.
CRISPY FISH TACO WITH PICKLED CARROTS
Ingredients 1 fillet dory fish 1 tsp soy sauce 2 tsp oyster sauce ½ tsp pepper 1 tsp lemon juice A pinch oregano Tempura (A classic regular tempura batter made with ice-cold water for crispiness) Flour, for regular tortilla 2 tbsp mayo 5-7 mint leaves, crushed ½ tsp lemon juice ½ carrot ½ cup vinegar
Method First, slice the carrots using a peeler for a finer finish. Leave them to be pickled by taking in small glass bowl, and drenching in vinegar, a pinch of ground black pepper. Rest for at least 25 minutes.
Prep the fish by cleaning and cutting. Marinate using soy sauce, oyster sauce, pepper, lemon juice, and leave for 15 minutes. Make the tempura batter with ice cold water. Now, on the side make the tortilla with flour, water, and salt (regular taco tortilla). Once done toasting the tortillas, make the lime-mint aioli by mixing in mayo, lemon juice, and the mint with little bit of ground pepper.
Finally, fry the fish dipping in tempura batter in deep fry. Then assemble the tacos by placing first the fish, then the pickled carrots, and finally the aioli on top.
Enjoy hot and crispy.
DATE FRAPPE
Ingredients 1 cup liquid milk 1 cup vanilla Ice cream 4-6 dates, depending on sweetness preferred 2 tsp coffee
Method First cup the dates into smaller pieces and get rid of the seeds. Blend all the ingredients together, and serve cold.
The cover of “Vegetable Revelations” evokes Salvador Dali, mainly because the surrealistic still life features meat and seafood hanging above the produce. Although all of the recipes in the cookbook are vegetable-forward, meat and fish occasionally make an appearance.
“I liked the idea of that, because to me this is an omnivore’s vegetable book,” Satterfield said. “But it could be interpreted in so many different ways. If you’re a vegan, there are plenty of options. If you’re a meat-eater who wants to get more produce into your diet, it’s a great solution.”
The headnotes to the recipes “explore the feelings” of each dish, Satterfield allowed. “They might conjure a hot sunny summer day, or a walk through the woods.”
Satterfield puts an emphasis on using every part of the vegetable, and not wasting any of the flavorful bits. He offers ideas for transforming asparagus bottoms into a lovely spring soup and using beet roots with their green tops for a stir-fry.
“That was a big thing in “Root to Leaf,” and that’s a big thing in my life’s work, and a big thing at the restaurant,” he said.
“‘Vegetable Revelations’ is about rediscovering the joy of cooking with vegetables. The triumph is that we came up with a beautiful book that still celebrates whole vegetable cooking — and there’s still so much more to explore.”
RECIPES
These recipes from James Beard Foundation Award-winning chef Steven Satterfield offer ways to cook a wide range of vegetables, with a variety dishes for each season. Arranged by both botanical families and culinary categories, the recipes are truly “Vegetable Revelations.”
Credit: Andrew Thomas Lee
Credit: Andrew Thomas Lee
Gingered Carrot Bisque
“You know those carrots that look like they were maybe forgotten in the field and got really big? That’s the kind I like to use here,” writes Steven Satterfield about this bisque recipe. “They have an earthy sweetness that gives body and depth to this soup laced with hints of ginger, lime, star anise and clove.” The tangy cultured dairy garnish adds a nice contrast to the mellow spices.
Recipes from “Vegetable Revelations.” Copyright 2023 by Steven Satterfield. Published by Harper Wave, an imprint of HarperCollins Publishers. Reprinted by permission.
Credit: Andrew Thomas Lee
Credit: Andrew Thomas Lee
Fava Bean Primavera With Spring Hazelnut-Herb Pesto
Fava beans require shucking and shelling, but the extra work is worth the effort. Chef Steven Satterfield calls the combination of sweet favas, al dente pasta and mixed-herb pesto “spring eating at its best.”
Spring Hazelnut-Herb Pesto
Credit: HarperCollins Publishers / Andrew Thomas Lee
Credit: HarperCollins Publishers / Andrew Thomas Lee
Ginger-Pecan Zucchini Crisp
“Using summer squash in baking should go far beyond zucchini bread,” says Satterfield, as he experiments with treating zucchini “as the fruit that it is.” Taking classic apple crisp as his cue, ginger and pecans add zing and crunch to the streusel topping.
ExploreThe ultimate guide to metro Atlanta food halls



 For all latest news, follow The Daily Star’s Google News channel.
