
Soul Food Mac and Cheese Recipe: How I Learned to Make Rich, Creamy Southern-Style Mac and Cheese

Soul Food Mac and Cheese Recipe: How I Learned to Make Rich, Creamy Southern-Style Mac and Cheese

Soul Food Mac and Cheese Recipe: How I Learned to Make Rich, Creamy Southern-Style Mac and Cheese

The first time I tried making soul food mac and cheese, I honestly thought it would be the same as the boxed macaroni I grew up eating. Boil pasta, add cheese sauce, done. That was my expectation anyway.

But when I tasted a real Southern-style baked mac and cheese at a family gathering years ago, I realized how different the real thing is. It was creamy, cheesy, slightly crispy on top, and packed with flavor. Nothing like the quick stovetop versions.

Of course, when I tried recreating it at home, my first attempt was… not great. The cheese sauce broke, the noodles soaked up too much liquid, and the final dish came out kind of dry. It still got eaten, but it wasn’t that rich, comforting dish I remembered.

After several tries, I finally learned the key tricks that make soul food mac and cheese truly special. Let me walk you through the recipe and the lessons I learned along the way.

What Makes Soul Food Mac and Cheese Different?

Soul food mac and cheese is a classic dish in Southern cooking and African American culinary traditions.

Unlike simple macaroni and cheese, this version is usually baked and made with several types of cheese.

It often includes:

Sharp cheddar cheese
Butter
Milk or evaporated milk
Eggs (for a custard-style texture)
Seasonings like paprika or mustard powder

The result is a rich, creamy dish with a golden, slightly crispy top layer.

That baked cheese crust is honestly one of the best parts.

Ingredients for Soul Food Mac and Cheese

One thing I quickly learned is that the quality of the cheese really matters.

Pre-shredded cheese works in a pinch, but freshly shredded cheese melts better and tastes richer.

Main Ingredients

1 pound elbow macaroni
3 cups shredded sharp cheddar cheese
1 cup shredded mozzarella cheese
1 cup shredded Monterey Jack cheese
2 cups whole milk
1 cup evaporated milk
3 tablespoons butter
2 large eggs

Using several cheeses gives the dish more depth of flavor.

The first time I made this recipe, I used only cheddar cheese. It was okay, but the texture wasn’t nearly as creamy.

Seasonings

1 teaspoon salt
½ teaspoon black pepper
½ teaspoon garlic powder
½ teaspoon paprika
½ teaspoon mustard powder (optional)

These small seasonings add warmth and balance to the cheese sauce.

Without them, mac and cheese can taste a bit flat.

Cooking the Macaroni

It may sound simple, but even cooking the pasta properly matters.

Step 1: Boil the Pasta

Bring a large pot of salted water to a boil.

Cook the elbow macaroni for about 1 to 2 minutes less than the package directions.

The pasta will finish cooking in the oven.

The first time I made this recipe, I fully cooked the pasta. After baking, it turned too soft and mushy.

Slightly undercooked pasta works much better.

Preparing the Cheese Mixture

The cheese mixture is what makes this dish so rich and creamy.

Step 2: Mix the Milk and Eggs

In a large bowl whisk together:

Whole milk
Evaporated milk
Eggs
Salt
Pepper
Garlic powder
Paprika
Mustard powder

This mixture creates a custard-like base when baked.

The eggs help bind everything together.

I was hesitant about adding eggs at first, but it’s actually one of the secrets to traditional Southern mac and cheese.

Layering the Mac and Cheese

Layering is what gives soul food mac and cheese its signature texture.

Step 3: Grease the Baking Dish

Preheat the oven to 350°F (175°C).

Grease a baking dish with butter.

A 9×13 dish works well for this recipe.

Step 4: Add the First Layer

Spread half of the cooked macaroni in the dish.

Sprinkle a generous layer of shredded cheese over the pasta.

This hidden layer of cheese melts beautifully inside the dish.

Step 5: Add the Second Layer

Add the remaining macaroni on top.

Then sprinkle the rest of the cheese evenly over the pasta.

I usually save a little extra cheddar for the top because that’s what creates the golden crust.

Adding the Milk Mixture

Now it’s time to bring everything together.

Step 6: Pour the Custard Mixture

Slowly pour the milk and egg mixture over the pasta.

Make sure the liquid spreads evenly through the dish.

Sometimes I gently shake the baking dish to help the liquid settle.

Baking the Soul Food Mac and Cheese

This is where the magic happens.

Step 7: Bake the Dish

Place the dish in the oven and bake for 35 to 40 minutes.

The top should turn golden brown and slightly crispy.

The center should look creamy but set.

The smell of melting cheese during this stage is honestly incredible.

Let the Mac and Cheese Rest

This step is easy to forget, but it really helps.

Step 8: Rest Before Serving

Let the mac and cheese rest for 10 minutes before serving.

This allows the sauce to thicken and set properly.

I used to scoop it immediately from the oven, and the sauce would run everywhere.

Waiting just a little makes the texture perfect.

How Soul Food Mac and Cheese Should Taste

When done right, this dish should be:

Creamy and rich inside
Slightly crispy on top
Deeply cheesy
Comforting and flavorful

The inside should feel soft and smooth, while the top layer adds a little crunch.

That contrast is what makes baked mac and cheese so satisfying.

Common Mistakes I Made While Learning This Recipe

Mac and cheese seems simple, but there are a few things that can go wrong.

Using Only One Type of Cheese

Different cheeses melt differently.

Using a mix gives the best flavor and texture.

Overcooking the Pasta

Fully cooked pasta becomes mushy in the oven.

Undercooking slightly helps maintain the right texture.

Skipping the Eggs

The eggs help create the classic baked mac and cheese structure.

Without them, the dish can feel too loose.

Tips That Helped Me Improve My Mac and Cheese

After making this recipe several times, a few tricks made a big difference.

Shred Cheese Yourself

Freshly shredded cheese melts much smoother than packaged shredded cheese.

Packaged cheese often contains anti-caking agents.

Use Evaporated Milk

Evaporated milk adds extra richness.

It also helps prevent the cheese from separating.

Add a Little Extra Cheese on Top

That extra layer creates the golden, crispy crust everyone loves.

Sometimes I sprinkle a little paprika on top for color.

What to Serve with Soul Food Mac and Cheese

Soul food mac and cheese pairs beautifully with classic comfort dishes.

Some popular pairings include:

Fried chicken
Barbecue ribs
Collard greens
Cornbread

It’s also perfect for holidays, family gatherings, and potluck dinners.

Honestly, it’s often the first dish to disappear from the table.

Final Thoughts on Making Soul Food Mac and Cheese

Soul food mac and cheese is more than just a side dish. It’s comfort food that brings people together.

My first few attempts weren’t perfect, but once I understood the importance of layering cheese and using the milk-and-egg mixture, the recipe finally came together.

Now it’s one of those dishes I enjoy making whenever I want something warm, rich, and satisfying.

And when that golden cheese crust forms on top fresh out of the oven… it’s pretty hard to resist going back for seconds.

Elevate Your Wedding Menu With Expert Wine Pairings

Elevate Your Wedding Menu With Expert Wine Pairings

Selecting wines to pair with each course at your wedding can elevate the dining experience, making each bite even more enjoyable as it’s matched with an ideal wine choice that enhances the flavors. Knowing how to pair wines with different dishes can transform your wedding meal. To help make your special day unforgettable, here are some essential tips for mastering wine pairings.

Matching flavors is key when pairing wine with food. The wine’s intensity should complement the richness of the dish. For instance, a crisp, light wine like Sauvignon Blanc pairs beautifully with seafood, salads, and lighter dishes, as its fresh notes amplify these flavors. On the other hand, a bold red like Cabernet Sauvignon complements heartier meals, such as steak or lamb, with its tannins enhancing the depth of the meat’s flavors.

Exploring contrasting flavors can add another dimension to the meal. A wine with high acidity can balance out richer dishes, allowing the flavors to shine. For example, a zesty wine like Pinot Grigio pairs wonderfully with richer foods like smoked salmon or creamy pasta, balancing the richness without overpowering the taste.

Complementary flavors also play a role in perfect pairings. When the wine’s notes match those of the dish, it creates a harmonious taste. For instance, a Chardonnay with hints of pear and apple pairs exquisitely with pork dishes featuring fruity accents, like roasted pork with apple chutney, enhancing the flavors of both the food and wine.

When planning wine selections for your wedding, consider winery wedding venues in Maryland, as these often offer curated wine lists and expert pairing suggestions. Many venues provide a range of high-quality, locally produced wines that can perfectly match each course, adding a distinctive regional touch to your celebration.

As you select wines, think about the flow of flavors. Begin with lighter wines and gradually move to fuller-bodied options. Sparkling or light white wines make a refreshing start with appetizers, while medium-bodied whites or mild reds are ideal for main courses. To close, serve a bold red or a sweet dessert wine, ensuring each course stands out while keeping the meal cohesive.

Adding a hint of sweetness with dessert wines, such as Riesling or Port, is a delightful option. These wines pair well with decadent desserts like chocolate cake, fruit tarts, or cheeses, bringing a satisfying close to the meal with an indulgent touch.

Ultimately, carefully chosen wine pairings enhance each dish, from appetizers to desserts. With wines that balance, contrast, or complement, your wedding meal becomes a memorable experience, creating a feast for you and your guests to savor.

The Art of Crafting the Perfect Wet Martini

The Art of Crafting the Perfect Wet Martini

Welcome to the world of mixology, where the classic cocktail, the Wet Martini, takes center stage. If you’re a fan of martinis or simply looking to indulge in a sophisticated drink, you’re in the right place. In this blog post, we’ll delve into the art of crafting the perfect wet martini. From its history and ingredients to the mixing techniques and garnishes, we’ll cover it all. So, grab your martini glass, and let’s embark on a journey of flavor and elegance.

The Origins of the Martini

Before we embark on crafting the perfect wet martini, it’s essential to understand its roots. The martini, often associated with elegance and sophistication, has a rich and intriguing history. While the exact origin remains a subject of debate among cocktail enthusiasts, several key points in its evolution are worth exploring.

  1. The Precursor: The Martinez – The martini is believed to have evolved from a cocktail called the Martinez, which was popular in the 19th century. This precursor featured a mix of gin, vermouth, and orange bitters, resembling the modern martini’s core ingredients.
  2. The Name Debate – The origin of the name “martini” is not entirely clear. Some attribute it to Martini & Rossi vermouth, while others believe it comes from the Martini brand of gin. Regardless of the name’s origins, the martini has left an indelible mark on the world of cocktails.
  3. Cultural Significance – Over time, the martini has become a symbol of sophistication and class. It has made numerous appearances in literature, film, and popular culture, often being associated with iconic characters like James Bond and his famous “shaken, not stirred” preference.

Understanding the historical backdrop of the martini adds depth to the appreciation of this timeless cocktail. So, with this historical context in mind, let’s continue our exploration of the wet martini.

Wet vs. Dry Martini

In the world of martinis, a critical choice you’ll encounter is whether to go “wet” or “dry.” This decision revolves around the proportion of vermouth in your martini and significantly impacts the cocktail’s flavor profile. Let’s delve into this martini dilemma:

  1. Wet Martini:
    • In a wet martini, you’ll use a more generous amount of vermouth. This means a higher vermouth-to-gin ratio compared to a dry martini.
    • The result is a martini that’s slightly sweeter and less alcoholic. The increased vermouth introduces a subtle, herbal complexity to the drink.
    • If you’re inclined toward a smoother, milder martini with a pronounced vermouth presence, the wet martini is an excellent choice.
  2. Dry Martini:
    • Contrasting with its “wet” counterpart, a dry martini contains less vermouth. It features a minimal amount, often a mere whisper or rinse of vermouth.
    • This leads to a martini with a more pronounced gin flavor, and it tends to be crisper and more potent in terms of alcohol content.
    • The dry martini is favored by those who appreciate the purity of gin and prefer a drier, sharper taste.

The choice between wet and dry martini ultimately comes down to personal preference. Some cocktail enthusiasts enjoy the subtle nuances of vermouth and the mellower character of a wet martini, while others opt for the bold, gin-forward notes of a dry martini. The beauty of the martini lies in its adaptability, allowing you to craft a drink that suits your taste perfectly.

The Essential Ingredients

To craft the perfect wet martini, it’s essential to have a solid understanding of the core ingredients that make up this timeless cocktail. Each component contributes to the martini’s distinct flavor and character. Let’s take a closer look at the essential elements:

  1. Gin:
    • Gin is the heart and soul of any martini. It provides the foundation for the cocktail’s flavor.
    • The botanicals in gin, which can include juniper, coriander, and citrus peels, lend depth and complexity to the martini.
    • For the best results, opt for a high-quality gin with a flavor profile that aligns with your preferences, whether it’s bold and juniper-forward or more citrusy and mellow.
  2. Vermouth:
    • Vermouth is a fortified wine that plays a crucial role in defining the character of your martini.
    • In a wet martini, you’ll use a more significant amount of vermouth compared to a dry martini, allowing its flavors to shine through.
    • Vermouth adds a nuanced herbal and slightly sweet note to your martini, creating a harmonious balance with the gin.
  3. Ice:
    • Ice is an often-overlooked but essential ingredient for chilling and diluting your martini to perfection.
    • Using high-quality, pure ice helps prevent excessive dilution, ensuring that your cocktail remains well-balanced.
  4. Garnish:
    • The garnish adds both visual appeal and flavor to your wet martini.
    • Two common garnishes are olives and lemon twists, each contributing unique elements to the drink.
    • Olives: The briny, savory flavor of olives complements the herbal and slightly sweet notes of the martini. Simply dropping one or more into your drink is a classic choice.
    • Lemon Twist: A twist of lemon peel adds a citrusy aroma and a burst of zest, which can elevate the martini’s aromatic profile.

Selecting high-quality ingredients is key to creating an exceptional wet martini. Experimenting with different gin and vermouth brands and garnishes can help you tailor your martini to your personal taste preferences. The next step in crafting your perfect wet martini is mastering the mixing techniques, which we’ll explore in the next section.

Mixing Techniques

Mixing a martini is an art form that can significantly influence the cocktail’s final texture and appearance. There are two primary techniques: stirred and shaken. Each method has its own unique qualities, and the choice between them is often a matter of personal preference.

  1. Stirred Martini:
    • The stirred martini is the more traditional and classic approach to mixing this cocktail.
    • To create a stirred martini:
      • Fill a mixing glass with ice.
      • Add the gin and vermouth to the glass.
      • Stir the mixture gently with a long bar spoon for about 30 seconds.
      • Strain the mixture into a chilled martini glass.
    • Advantages of a stirred martini:
      • Clarity: This method typically results in a crystal-clear martini, showcasing its translucent beauty.
      • Velvety Texture: The gentle stirring creates a smooth, velvety mouthfeel, which some martini enthusiasts prefer.
  2. Shaken Martini:
    • Shaking a martini involves more vigorous mixing and aeration.
    • To create a shaken martini:
      • Fill a shaker with ice.
      • Add the gin and vermouth.
      • Shake the mixture vigorously for about 15-20 seconds.
      • Strain the mixture into a chilled martini glass.
    • Advantages of a shaken martini:
      • Aeration: Shaking introduces air into the cocktail, creating a slightly cloudy appearance and a different texture.
      • Chilled to Perfection: Shaking ensures the martini is exceptionally cold, making it ideal for those who prefer a well-chilled drink.

The choice between a stirred and a shaken martini often comes down to personal preference. Some individuals gravitate towards the clarity and velvety texture of a stirred martini, while others enjoy the aeration and icy-cold nature of a shaken one. To truly appreciate the martini, you may want to experiment with both techniques and discover which suits your taste best. In the next section, we’ll explore the final touches that make a wet martini truly outstanding: garnishes and presentation.

Garnishes and Presentation

The garnish and presentation of a wet martini are the final touches that transform this classic cocktail into a work of art. These elements not only add visual appeal but also contribute to the overall flavor and aromatic experience. Here’s what you need to know:

1. Olives:

  • Olives are one of the most iconic and traditional martini garnishes.
  • They provide a briny and savory flavor that complements the herbal and slightly sweet notes of the martini.
  • To garnish with olives, simply skewer one or more olives (often green or black) and drop them into your martini glass.
  • The number of olives used is a matter of personal preference; some prefer one, while others enjoy multiple olives for an extra briny kick.

2. Lemon Twist:

  • A lemon twist adds a citrusy aroma and a burst of zest to your martini.
  • It enhances the aromatic profile of the cocktail and provides a refreshing, tangy note.
  • To create a lemon twist, take a lemon peel and gently twist it over the martini to release the citrus oils. Then, place it in the martini as a garnish.

3. Presentation:

  • The martini glass is the classic choice for serving a martini, and its unique design contributes to the cocktail’s elegance.
  • The iconic triangular shape and long stem of the martini glass not only provide a distinctive appearance but also make it ideal for sipping and savoring the flavors.
  • To enhance the presentation, chill the martini glass in the freezer before pouring the cocktail, creating a frosted effect.

The garnish and presentation you choose can have a significant impact on your wet martini experience. Whether you opt for the traditional olives or a lemon twist, and whether you serve your martini in a classic martini glass or another elegant vessel, remember that presentation is the final step in creating a visually stunning and flavorful wet martini. In the next section, we’ll provide you with a step-by-step guide to craft your perfect wet martini, combining all the knowledge you’ve gained so far.

Crafting Your Perfect Wet Martini

Now that you’ve delved into the history, understood the ingredients, and learned the mixing techniques, it’s time to bring it all together and craft your own perfect wet martini. Below is a step-by-step guide to help you create a martini that suits your taste:

Ingredients:

  • 2 ½ oz gin (select a gin that aligns with your flavor preferences)
  • ¾ oz vermouth (adjust for your preferred level of ‘wetness’)
  • Ice (high-quality, pure ice works best)
  • Lemon twist or olives for garnish

Instructions:

  1. Prepare Your Glassware:
    • Chill your martini glass by placing it in the freezer or filling it with ice and water. This creates a frosted glass that enhances presentation.
  2. Fill the Mixing Glass:
    • Fill a separate mixing glass with ice.
  3. Add Gin and Vermouth:
    • Pour 2 ½ oz of your chosen gin into the mixing glass.
    • Add ¾ oz of vermouth. Adjust the vermouth quantity based on your preferred ‘wetness.’ More vermouth makes it wetter; less makes it drier.
  4. Stir Gently:
    • Stir the mixture gently with a long bar spoon for approximately 30 seconds. The aim is to chill and dilute the martini while maintaining its clarity.
  5. Strain into the Chilled Glass:
    • Using a julep strainer or the mixing glass’s built-in strainer, pour the martini into the chilled martini glass.
  6. Garnish Your Martini:
    • Garnish your wet martini with either olives or a lemon twist based on your preference.
    • For olives, skewer one or more and drop them into your martini.
    • For a lemon twist, gently twist a strip of lemon peel over the martini to release the citrus oils and place it in the martini as a garnish.
  7. Serve and Enjoy:
    • Your perfect wet martini is ready. Serve it with elegance and enjoy every sip.

Remember, the beauty of the martini is its versatility. You can adjust the ingredients’ quantities, the choice of gin, vermouth, or garnish to tailor the martini precisely to your liking. Whether you prefer it shaken or stirred, garnished with olives or a lemon twist, crafting your wet martini is an art that allows you to savor your unique flavor preferences. Cheers to your mixology adventure!

Conclusion

As we conclude our exploration of the art of crafting the perfect wet martini, it’s essential to reflect on the journey we’ve embarked upon. The wet martini is more than just a cocktail; it’s a timeless classic that embodies sophistication, elegance, and a world of flavors.

In this blog post, we’ve covered various aspects of the wet martini, from its intriguing historical origins to the fundamental ingredients, mixing techniques, garnishes, and presentation. By understanding the choices you have and the techniques you can employ, you’re now well-equipped to create a martini that perfectly suits your taste.

The beauty of the wet martini lies in its adaptability. Whether you prefer it wet or dry, stirred or shaken, garnished with olives or a lemon twist, the possibilities are endless. It’s a cocktail that invites you to explore and express your unique flavor preferences.

So, the next time you want to savor a touch of sophistication and indulge in a timeless classic, remember the art of crafting the perfect wet martini. Experiment, enjoy, and share this exquisite cocktail with friends and fellow enthusiasts. Cheers to the world of mixology and the enduring charm of the wet martini!

Choosing the Perfect Wooden Wine Rack for Your Home: A Comprehensive Guide

Choosing the Perfect Wooden Wine Rack for Your Home: A Comprehensive Guide

Wine enthusiasts understand that proper storage is the secret to preserving the essence of every bottle. If you’ve chosen to go the timeless route with a wood wine rack but are unsure of the nuances to look out for, this guide has got you covered.

1. Size & Capacity

Your foremost concern should be the rack’s size and capacity. Wooden wine racks range from compact designs suitable for countertops to larger freestanding models. Decide how many bottles you want to store currently and consider any future additions to your collection. Also, measure the designated space in your home to ensure a seamless fit.

2. Type of Wood

Different woods not only impact the rack’s aesthetics but its durability and longevity:

  • Pine: A popular choice for its affordability and versatile appearance.
  • Cedar: Known for its pleasant aroma which can deter pests, but remember to ensure it doesn’t impact the wine’s flavor.
  • Mahogany: Durable and resistant to moisture, making it a premium choice for wine storage.

Pick a wood type that complements your home’s décor and fits within your budget.

3. Style & Design

Wooden wine racks boast diverse styles:

  • Tabletop Racks: Compact designs suitable for countertops or tables.
  • Wall-mounted Racks: Space-saving solutions that double as wall art.
  • Freestanding Racks: These are often larger and can become a statement piece in a room.

The style should resonate with your home’s overall theme and the space available.

4. Horizontal vs. Vertical Storage

Opt for wooden racks that store bottles horizontally. This ensures the wine remains in contact with the cork, preventing it from drying out. A dry cork can lead to air seepage, spoiling the wine over time.

5. Modularity & Expandability

Some wooden wine racks come with modular features. If you foresee an expanding collection, having the option to extend your rack seamlessly might be a feature worth considering.

6. Finish & Durability

Look for wooden racks that have a good quality finish, ensuring protection against moisture and pests. A good finish also adds to the aesthetic appeal. Consider the rack’s sturdiness, especially if you’re opting for larger models.

7. Price

Wooden wine racks can vary widely in price based on the wood type, craftsmanship, and size. Set a budget and weigh the rack’s features against its price to ensure value for money.

8. Reviews & Recommendations

Before making a purchase, it’s always wise to check reviews or seek recommendations. Fellow wine enthusiasts can provide insights into the durability, functionality, and aesthetics of particular wooden racks.

In conclusion, while wooden wine racks are a nod to the classic way of storing wine, there’s a lot to consider before picking the right one. From the type of wood to the rack’s design, ensuring you’ve made an informed choice will mean years of enjoying perfectly stored wine in style.

The Ultimate Guide to Obtaining a Liquor License

The Ultimate Guide to Obtaining a Liquor License

Adding the sale of alcohol to your restaurant, bar, or other business can increase profits and customer numbers. However, obtaining a license is no walk in the park. Fingerprint cards, local government permission, and company documentation are all typically required. Additionally, many states have limited licenses, making them hard to come by.

How to Apply for a Liquor License

If you are starting a new business, obtaining a liquor license Houston, TX, can help you reach your sales goals and attract more customers. However, the application process is complex and requires careful attention to detail. Working with a business attorney who understands liquor licensing laws and requirements is essential. Before beginning the application process, you should decide what type of liquor license you need. Eight off-premises (bars, restaurants, grocery, and drug stores) and 20 manufacturer licenses are available. Applying for a manufacturer or off-premises license involves several steps and may take months to complete. Getting input from your local Community Board is also essential and can significantly impact the approval or rejection of your application. Lastly, you must ensure that the premises you plan to have a current certificate of occupancy and have been issued a building permit. A violation of any of these laws can significantly delay your license approval.

State Alcoholic Beverage Control (ABC) Requirements

The State’s alcoholic beverage control (ABC) agency must approve the liquor license you need for your business. The licensing process can take from a few weeks to several months. State and local government restrictions and requirements also vary greatly, so getting involved with your community early in the process is essential. Some states divide licenses into categories for manufacturers, wholesalers, and retailers. The manufacturer licenses to produce alcohol, and the wholesalers sell it to the retailers. The retail licenses cover bars, restaurants, and convenience/gasoline/convenience stores that will sell and serve alcoholic beverages for consumption on or off the premises. The retail liquor licenses may also include taverns and beer, wine, and spirits stores.

A privatized system would allow more outlets, longer hours of sale, and greater advertising, resulting in higher consumption and greater costs to society for law enforcement, education, and addiction treatment services. The State’s current ABC system is receipt supported, with profits going to the local ABC boards for distribution locally.

Community Board Opinions

Once you’ve gathered all the required documentation and fees, including State, local, and processing fees, please submit it to your state ABC agency. It is important to note that a license can cost thousands of dollars, so your application package must be complete and correct. In some cities, Community Boards must be notified of an application for liquor licensing and have 30 days to express their opinion to the State Liquor Authority (SLA). If the Community Board opposes your license request, getting approval from the SLA will be easier. Due to the numerous legal requirements, many businesses seek the assistance of an experienced business lawyer specializing in liquor licensing.

Legal Requirements

If you need help obtaining your liquor license, consult a lawyer familiar with the process. Applying for a license is a complex and lengthy process, and if you complete any steps, your application can be completed on time. You may also be required to publish a notice of your application in the newspaper, which can take up to six weeks or more to complete. Depending on the establishment you operate if you plan to sell food on the premises, there are 25 different types of liquor licenses you can obtain, depending on the establishment you operate. You will be required to submit a variety of documentation, including floor plans of the facility and your proposed menu, as well as copies of your zoning permits, health permit, and building permits. You may also be required to provide fingerprints and other background checks.

14 Best Food and Drink Coronation Recipes

14 Best Food and Drink Coronation Recipes

We may earn commission from links on this page, but we only recommend products we back.

1

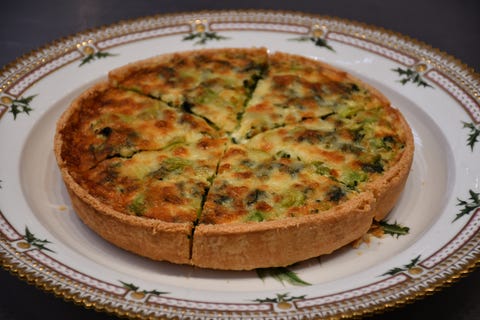
The King and Queen Consort’s Coronation Quiche

coronation quiche
Buckingham Palace

King Charles and Queen Camilla shared this “coronation quiche” recipe, described as “a deep quiche with a crisp, light pastry case and delicate flavours of Spinach, Broad Beans and fresh Tarragon. Eat hot or cold with a green salad and boiled new potatoes—perfect for a Coronation Big Lunch!”

Get the recipe

2

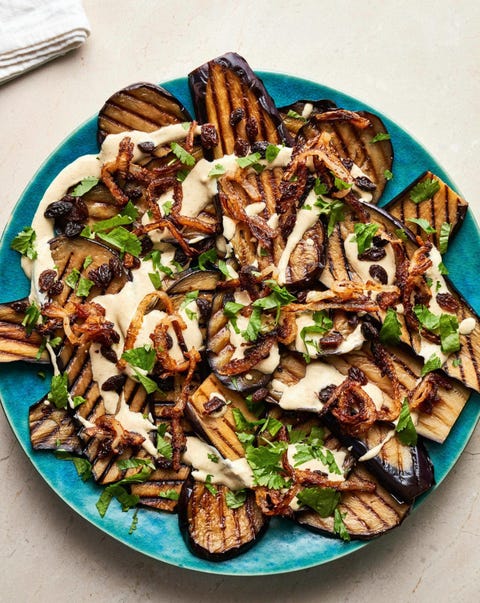
Nadiya Hussein’s Coronation Aubergine

nadiya coronation aubergine
Nadiya Hussain

“Aubergines often feature as a side dish when served at a table for dinner, but not here. We are taking this delicious aubergine, coating it with flavour, frying till tender and then drizzling over the simplest coronation dressing. It’s like dinner at my mum’s collided with my lunches at school to create this beauty,” Nadiya Hussain, winner of Great British Bake Off, writes in Nadiya’s Fast Flavours.

Get the recipe

3

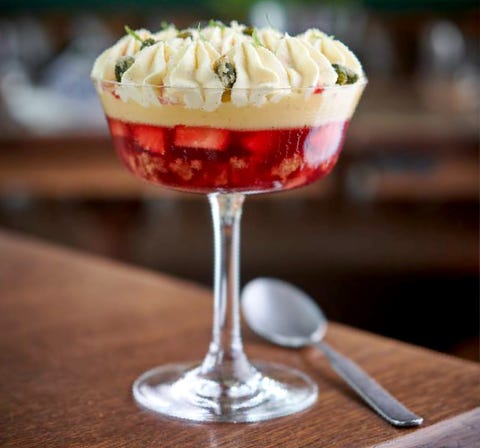
Adam Handling’s Strawberry and Ginger Trifle

adam handling's strawberry and ginger trifle
Adam Handling

What’s a more English dessert than a trifle? Adam Handling, a Michelin-starred chef and owner, created this strawberry and ginger trifle especially for the coronation.

Get the recipe

Advertisement – Continue Reading Below

4

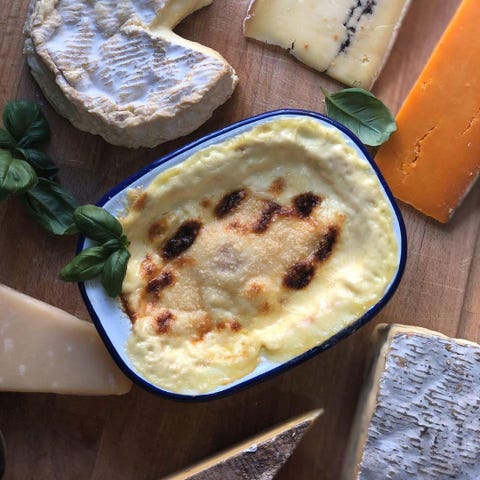
King Charles’s Favorite Cheesy Baked Eggs

cheesy baked eggs
Clarence House

In 2020, Clarence House—which represented then-Prince Charles and Camilla, Duchess of Cornwall—shared that one of Charles’s favorite cheesy baked eggs. “One thing that undoubtedly brings many of us great comfort is good food,” Charles said, calling British cheese “one of the most wonderful joys in life.” It’s a perfect breakfast for watching the coronation.

Get the recipe

5

The Dorchester’s Sovereign Martini

charles at fernie hunt
Tim Graham//Getty Images

King Charles’s favorite drink is reportedly a martini. To celebrate the coronation, British hotel the Dorchester will be serving the “Sovereign Martini”–made of Wessex gin, Royal Garden mead, dry vermouth, lavender bitter and orange scent—at their Vesper Bar.

If you’re not in London, however, you can totally make your own martini at home:

26 Martini recipes

6

Royal Sipsmith Martini

coronation recipe
Sipsmith

British gin brand Sipsmith also released a special coronation martini, called, naturally, the “Royal Sipsmith Martini.” It’s very easy to make:

The recipe:

Ingredients

Method:

  1. Fill a mixing glass with ice
  2. Add the vermouth and stir for a few seconds
  3. Add the gin to the mixing glass and stir briskly for 50 turns
  4. Strain into a chilled glass and spritz with the zest of a lemon peel

Advertisement – Continue Reading Below

7

nyetimber Nyetimber Classic Cuvee Coronation Limited Edition

Nyetimber Classic Cuvee Coronation Limited Edition

7

nyetimber Nyetimber Classic Cuvee Coronation Limited Edition

Now 26{d2b09b03d44633acb673e8080360919f91e60962656af8ade0305d5d8b7e4889} Off

If you want to pop some bubbly for the coronation, why not turn to English sparkling wine? British brand Nyetimber released this limited edition bottle of their Classic Cuvee MV, a blend of Chardonnay, Pinot Noir, and Pinot Meunier from West Sussex. The bottle was inspired by royal garments and uniforms. All you have to do is pour it into some champagne glasses, and enjoy.

8

Fortnum & Mason Fortnum’s Coronation Organic Darjeeling Tea

Fortnum's Coronation Organic Darjeeling Tea

8

Fortnum & Mason Fortnum’s Coronation Organic Darjeeling Tea

Coronation Cookies

Credit: Matt Taylor-Gross

William Greenberg Desserts makes some of T&C‘s favorite sweets, including an iconic black-and-white cookie. But the New York City staple is going international for King Charles’s coronation with these delicious butter shortbread cookies, topped with an icing crown in honor of King Charles III. They’re great on their own or dunked into a mug of coronation tea, but if you want to add these treats to your table, act fast; they’re baked daily and when they’re gone for that day, they’re gone. To reserve in advance, call 212-861-1340.

Advertisement – Continue Reading Below

10

Woodford Reserve’s High Tea with the King

coronation woodford reserve
Courtesy Woodford Reserve

The coronation is taking place on the same day as the Kentucky Derby, so why not celebrate both with this cocktail, which is a blend of Early Grey infused simple syrup and Woodford Reserved Bourbon. As the brand notes, “travel your tastebuds from London to Louisville.”

The recipe:

  • 1 oz brown butter fat washed Woodford Reserve Bourbon
  • 1 oz Woodford Reserve Rye
  • 1/4 oz Earl Gray Rich Simple Syrup
  • 2.5 mL Woodford Reserve Sorghum & Sassafras bitters

Brown butter fat wash: Melt 1 stick of butter in a small saucepan over low heat. Stir constantly and observe until milk solids brown and there is a distinctly nutty aroma. Pour directly into 2 cups of Woodford Reserve Bourbon. Allow to infuse overnight in the fridge. Strain off after a minimum of 10 hours.

Earl Gray Syrup: Brew very strong Earl Gray tea. I used 2 teabags for 200g of hot water. Add 400g of white granulated sugar to the brewed tea. Stir until dissolved. (This is a 2:1 rich simple syrup.)

11

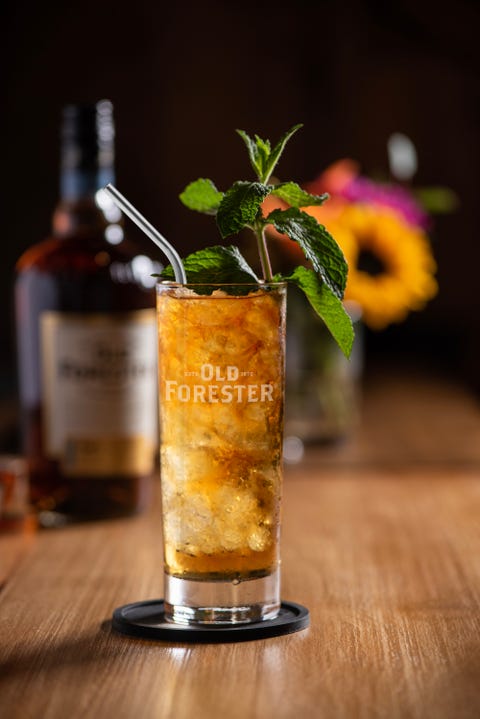
Old Forester’s The Crown Julep

the crown julep
Courtesy Old Forester

Another Kentucky Derby x Coronation mash-up comes in the form of this “Crown Julep” drink from Old Forester.

The recipe:

*To create syrup, use a 1:1 ratio of demerara sugar to Earl Grey tea brew.

Directions: Add the Earl Grey syrup and mint leaves to a Julep cup and gently muddle together. Add a heaping scoop of crushed ice to the cup, followed by 2 oz. Old Forester & 1 oz. Pimm’s. Gently stir and then garnish with a bunch of fresh mint.

Advertisement – Continue Reading Below

14

The Victoria Sponge

the duchess of cornwall visits the fair day centre
WPA Pool//Getty Images

Queen Victoria regularly ate a slice of sponge cake with her tea. As King Charles III is the first monarch to be descended from Victoria on both sides, honoring the British queen just makes sense. Buckingham Palace Pastry Chefs shared the recipe for the “Victoria Sponge” a few years ago for Royal Garden parties, and it feels right to make it for the coronation.

Get the recipe

Camilla, then the Duchess of Cornwall, is given a Victoria Sponge by head chef Sue Hayes during her visit to the The Fair Close Centre on March 22, 2018.

15

Royal Salute Royal Salute The Coronation of King Charles III Edition Scotch Whisky

Royal Salute The Coronation of King Charles III Edition Scotch Whisky

15

Royal Salute Royal Salute The Coronation of King Charles III Edition Scotch Whisky

Headshot of Emily Burack

Emily Burack (she/her) is the news writer for Town & Country, where she covers entertainment, culture, the royals, and a range of other subjects. Before joining T&C, she was the deputy managing editor at Hey Alma, a Jewish culture site. Follow her @emburack on Twitter and Instagram. 

Advertisement – Continue Reading Below

Advertisement – Continue Reading Below