From Kitchen Notes to a Recipe Blog Readers Can Trust

From Kitchen Notes to a Recipe Blog Readers Can Trust

A recipe often begins as a scribble on a flour-dusted page: a handful of herbs, an oven temperature, or a note to add more lemon next time. Turning that idea into a recipe other people can cook takes a little more care. Clear measurements, repeatable testing, and honest descriptions help readers get good results—and make a personal collection of favorite dishes useful well beyond your own kitchen.

Start With a Dish You Know Well

The best first recipe to write down is one you have cooked more than once. Familiarity helps you notice what matters: how finely the onion should be chopped, what the mixture looks like before it goes into the oven, and which steps can happen while something else cooks. A dish you know also gives you a reliable starting point for testing changes.

Write down the ingredients as you use them, not from memory afterward. Include quantities, preparation details, and the order in which they go into the pan. “One onion” may be enough for your household, but a more useful note might specify a medium onion, finely diced. Record the pan size and heat level, too. These small details can make a recipe easier to repeat.

Test Before You Publish

A recipe that tastes good once may still need refining. Cook it again, following your written directions as if you were a new reader. If you find yourself relying on an unrecorded instinct—adding water until the sauce looks right, for example—note what that looks like or give a range to guide others.

Change only one or two things at a time when testing. If a loaf is dense, adjusting the flour and the liquid together makes it harder to know what helped. Keep a simple kitchen log with the date, ingredient amounts, cooking time, and result. The next attempt can then build on useful information rather than guesswork.

Pay attention to the difference between a precise instruction and a helpful cue. “Bake for 25 minutes” is a starting point; “bake until the edges are golden and a toothpick comes out with a few moist crumbs” gives readers a way to judge doneness in ovens that run differently.

Write Steps That Reduce Guesswork

Put the ingredients in the order they are used, and group them when a recipe has distinct parts, such as a sauce and a filling. Use familiar measurements and state whether ingredients are packed, sifted, drained, or at room temperature when that detail affects the outcome. For foods that need safe handling, include practical guidance such as cooking poultry to a safe internal temperature and refrigerating leftovers promptly.

Keep each instruction focused on one action where possible. “Warm the oil, add the garlic, and cook until fragrant” is clearer than a paragraph that combines chopping, frying, seasoning, and simmering. Mention visual and sensory cues alongside times, since ingredient size, cookware, and appliances can all affect cooking speed.

  • Give a yield: State how many servings the dish makes, or how many portions it produces.
  • Explain preparation: Clarify whether vegetables are peeled, chopped, or measured after cooking.
  • Offer substitutions carefully: Note changes that you have tested, and explain when they may affect texture or flavor.
  • Include storage advice: Say how to refrigerate or freeze leftovers and how to reheat them.

Make the Recipe Easy to Find and Use

A useful recipe page answers readers’ questions without making them search through a long story. A short introduction can explain what the dish tastes like, when you serve it, or what makes the method distinctive. Then make the recipe details easy to scan, with clear headings for ingredients, preparation, cooking time, and serving suggestions.

If you publish recipes online, basic search guidance can help the right readers discover them. The iCopify blog covers topics such as SEO and publishing, which can help food writers understand how online content is found. Apply that knowledge without letting keywords take over: an accurate title, a direct description, and useful answers to common cooking questions are better for readers than repeated search phrases.

Use Photos to Clarify, Not Just Decorate

A photograph can show the texture of a finished dish, the color of a properly browned crust, or how a serving should look. Natural light near a window often gives food a clear, appealing appearance. Keep the setting simple enough that the dish remains the focus, and consider adding a process photo when a visual step—such as shaping dough—is difficult to describe.

Good photos take practice, but food creators do not have to handle every task alone. A freelance marketplace such as Osdire spans services including food photography, graphic design, and writing. If you hire help, agree on the deliverables and style in advance, and make sure the final images accurately represent the recipe readers will make.

Keep Improving the Collection

After publishing, pay attention to the questions people ask and the points where they get stuck. If several readers wonder whether a sauce can be made ahead, add a tested answer. If a substitution changes the result, explain that clearly. Updating a recipe with better instructions is part of caring for it, just as adjusting seasoning is part of cooking.

A trustworthy recipe is not simply a list of ingredients. It is a record of a dish that has been tested, explained, and made easier for someone else to enjoy. Whether you are preserving family favorites or sharing new experiments, careful notes and reader-focused directions turn kitchen knowledge into something people can return to—and cook with confidence.

Chicken Parmesan Recipe: How I Finally Got That Crispy, Cheesy Restaurant-Style Chicken Parm at Home

Chicken Parmesan Recipe: How I Finally Got That Crispy, Cheesy Restaurant-Style Chicken Parm at Home

Chicken Parmesan Recipe: How I Finally Got That Crispy, Cheesy Restaurant-Style Chicken Parm at Home

The first time I tried making chicken parmesan, I thought it would be simple. Bread some chicken, fry it, add sauce and cheese, then bake it. Easy enough, right?

Well… my first attempt was a bit of a disaster. The breading fell off, the chicken wasn’t very crispy, and the sauce made everything soggy. It still tasted good, but it definitely didn’t look like the beautiful chicken parm you see in restaurants.

After a few more attempts and a lot of small adjustments, I finally figured out how to make crispy, juicy chicken parmesan that actually holds together and tastes incredible. Turns out the secret is all about layering the flavors properly and not rushing the breading process.

Now it’s one of my favorite comfort meals to cook, especially when I want something hearty but still homemade. Let me show you the chicken parmesan recipe that worked best for me.

What Is Chicken Parmesan?

Chicken parmesan, also known as chicken parmigiana, is a classic Italian-American dish.

It consists of:

Breaded chicken cutlets
Tomato marinara sauce
Melted mozzarella cheese
Parmesan cheese

The chicken is usually fried until crispy, then topped with sauce and cheese and finished in the oven.

It’s often served with:

Spaghetti
Garlic bread
Salad

The combination of crispy chicken, rich tomato sauce, and melted cheese is what makes the dish so satisfying.

Ingredients for Chicken Parmesan

One thing I like about this recipe is that most ingredients are pantry staples.

Main Ingredients

2 large chicken breasts
1 cup marinara sauce
1 cup shredded mozzarella cheese
½ cup grated Parmesan cheese
Olive oil for frying

Chicken breasts work best when sliced into thinner cutlets.

The first time I made this recipe, I used thick chicken breasts without cutting them. The outside cooked too fast while the inside stayed undercooked.

Lesson learned.

Breading Ingredients

1 cup breadcrumbs (preferably panko)
½ cup grated Parmesan cheese
1 teaspoon garlic powder
1 teaspoon Italian seasoning
½ teaspoon salt
½ teaspoon black pepper

Panko breadcrumbs give the chicken extra crispiness, which I personally love.

Egg Coating

2 large eggs
2 tablespoons milk

This mixture helps the breadcrumbs stick to the chicken.

Preparing the Chicken Cutlets

This step is important for even cooking.

Step 1: Slice the Chicken

Cut each chicken breast horizontally to create thinner pieces.

You should end up with 4 chicken cutlets.

Thin cutlets cook faster and more evenly.

Sometimes I lightly pound them with a meat mallet to make them even thinner.

Step 2: Season the Chicken

Sprinkle both sides of the chicken with a little salt and pepper.

Seasoning the meat itself makes a big difference in the final flavor.

I used to rely only on the breading for flavor, and the chicken tasted a bit bland.

Setting Up the Breading Station

Breaded chicken works best when you prepare everything in advance.

Step 3: Prepare Three Bowls

Set up three shallow bowls:

Flour (about ½ cup)
Egg mixture (eggs + milk)
Breadcrumb mixture

The breadcrumb mixture should contain:

Breadcrumbs
Parmesan
Garlic powder
Italian seasoning
Salt and pepper

This setup makes the breading process much smoother.

Breading the Chicken

Now comes the part where patience really helps.

Step 4: Coat the Chicken

Dip each chicken cutlet in the following order:

Flour
Egg mixture
Breadcrumb mixture

Press the breadcrumbs gently onto the chicken so they stick well.

The first time I rushed this step and barely pressed the coating. The breading slid right off while frying.

Step 5: Let the Chicken Rest

Place the breaded chicken on a plate and let it sit for 10 minutes.

This helps the coating stick better during cooking.

It’s a small trick, but it really works.

Cooking the Chicken

This is where the crispy texture develops.

Step 6: Fry the Chicken

Heat olive oil in a large skillet over medium heat.

Cook the chicken for 3 to 4 minutes per side until golden brown.

The crust should look crispy and evenly browned.

You don’t need a lot of oil, just enough to coat the bottom of the pan.

Adding Sauce and Cheese

Once the chicken is crispy, it’s time to add the classic toppings.

Step 7: Add Marinara Sauce

Place the cooked chicken in a baking dish.

Spoon marinara sauce over each piece.

Be careful not to add too much sauce.

The first time I made chicken parmesan I drowned the chicken in sauce. The crispy coating disappeared instantly.

Step 8: Add Cheese

Top each chicken piece with:

Mozzarella cheese
A little extra Parmesan

The combination creates that classic cheesy layer everyone loves.

Finishing in the Oven

The oven melts the cheese and brings everything together.

Step 9: Bake the Chicken Parmesan

Preheat the oven to 375°F (190°C).

Bake the chicken for 10 to 15 minutes.

The cheese should melt and bubble slightly.

Sometimes the edges even get a little golden, which looks amazing.

How to Serve Chicken Parmesan

Chicken parmesan is incredibly versatile.

Here are a few ways I like to serve it.

With Spaghetti

This is the classic pairing.

Serve the chicken on top of spaghetti with extra marinara sauce.

It’s a hearty, comforting meal.

Chicken Parmesan Sandwich

Place the chicken inside a toasted sandwich roll.

Add extra sauce and melted mozzarella.

It’s messy but incredibly delicious.

With Garlic Bread and Salad

Sometimes I skip pasta and serve chicken parmesan with:

Garlic bread
Caesar salad

It feels lighter but still satisfying.

Common Mistakes I Made When Cooking Chicken Parmesan

Even simple recipes have their tricky moments.

Using Too Much Sauce

Too much marinara makes the breading soggy.

A thin layer works best.

Skipping the Flour Step

Flour helps the egg stick to the chicken.

Without it, the breading can slide off.

Cooking Chicken That’s Too Thick

Thick chicken breasts cook unevenly.

Thin cutlets ensure the chicken stays juicy and fully cooked.

Tips That Helped Me Improve This Recipe

After making chicken parmesan many times, a few small tricks made it even better.

Use Freshly Grated Parmesan

Fresh Parmesan melts better and tastes richer.

Pre-grated cheese sometimes feels a bit dry.

Use Panko Breadcrumbs

Panko breadcrumbs create a crispier crust.

Regular breadcrumbs work too, but panko adds extra crunch.

Let the Chicken Rest After Frying

Resting the chicken for a couple minutes keeps the crust crisp before adding sauce.

Final Thoughts on Making Chicken Parmesan

Chicken parmesan is one of those meals that feels like restaurant food but is actually pretty easy to make at home.

The key lessons I learned were simple:

Slice the chicken thin
Bread it properly
Fry until crispy
Add sauce carefully

Once those steps come together, the result is crispy, juicy chicken topped with rich marinara and melted cheese.

And honestly, when that cheese starts bubbling in the oven and the kitchen smells like garlic and tomato sauce… it’s hard not to feel a little proud of the dish.

Pulled Pork Recipe: How I Learned to Make Tender, Juicy Pulled Pork at Home

Pulled Pork Recipe: How I Learned to Make Tender, Juicy Pulled Pork at Home

The first time I tried making pulled pork, I thought it would be easy. Throw some pork in the oven, add barbecue sauce, and wait. That was my brilliant plan.

Well… it didn’t go so well. The pork came out tough, a little dry, and honestly kind of disappointing. It tasted okay, but it definitely wasn’t that fall-apart, juicy pulled pork you get at good barbecue places.

After a few attempts and a lot of experimenting with cooking times and seasoning, I finally figured out the method that works every time. The secret is slow cooking, patience, and letting the meat break down naturally.

Once I got it right, pulled pork became one of my favorite things to cook. It’s easy, feeds a crowd, and the leftovers are fantastic. So let me walk you through the pulled pork recipe I rely on now.

What Is Pulled Pork?

Pulled pork is a slow-cooked pork dish where the meat becomes so tender that it can literally be pulled apart with forks.

It’s commonly used in:

Barbecue sandwiches
Tacos
Nachos
Rice bowls
Sliders

The traditional cut used is pork shoulder, sometimes called pork butt or Boston butt.

This cut has enough fat and connective tissue to stay juicy during long cooking times. Leaner cuts like pork loin don’t work as well because they dry out too quickly.

The first time I made pulled pork, I used pork loin. Big mistake. Lesson learned.

Ingredients for a Simple Pulled Pork Recipe

One thing I love about pulled pork is that the ingredient list is simple but full of flavor.

Main Ingredients

3 to 4 pounds pork shoulder (boneless or bone-in)
2 tablespoons olive oil
1 cup barbecue sauce
½ cup chicken broth or apple juice

The liquid helps keep the meat moist while it cooks.

I’ve tried both broth and apple juice, and honestly apple juice gives the pork a subtle sweetness that works really well.

Dry Rub Ingredients

A good dry rub adds most of the flavor.

2 tablespoons brown sugar
1 tablespoon paprika
1 teaspoon garlic powder
1 teaspoon onion powder
1 teaspoon salt
½ teaspoon black pepper
½ teaspoon smoked paprika (optional)
½ teaspoon chili powder

You can adjust the spices depending on how smoky or spicy you like your pulled pork.

Preparing the Pork Shoulder

Before cooking, the pork needs to be seasoned properly.

Step 1: Pat the Pork Dry

Use paper towels to pat the pork shoulder dry.

This helps the seasoning stick better.

It’s a small step, but it makes a difference.

Step 2: Apply the Dry Rub

Rub the spice mixture all over the pork.

Make sure every side is covered.

I like to massage the spices into the meat a little. It feels weirdly satisfying and helps the flavor penetrate.

If you have time, let the seasoned pork sit for 30 minutes to an hour before cooking.

Sometimes I even leave it in the fridge overnight when I remember.

Cooking Pulled Pork Low and Slow

This is where patience really matters.

Pulled pork becomes tender only after hours of slow cooking.

Step 3: Sear the Pork (Optional but Worth It)

Heat olive oil in a large skillet over medium-high heat.

Sear the pork on each side for about 2 to 3 minutes.

This creates a flavorful crust.

I used to skip this step, but the extra flavor from searing is definitely noticeable.

Step 4: Transfer to Slow Cooker or Oven

Place the pork in a slow cooker or Dutch oven.

Add the chicken broth or apple juice.

Cover and cook slowly.

Cooking Times for Pulled Pork

Pulled pork needs time for the connective tissue to break down.

Here are the typical cooking options.

Slow Cooker Method

Cook on low for 8 to 10 hours.

This is the easiest method.

I usually start it in the morning and by dinner the pork is perfectly tender.

Oven Method

Preheat the oven to 300°F (150°C).

Cover the pork tightly with foil or a lid.

Cook for 4 to 5 hours until the meat is very tender.

The pork should shred easily with a fork when it’s ready.

If it doesn’t pull apart easily, it probably needs another hour.

Shredding the Pulled Pork

Once the pork is cooked, it’s time for the fun part.

Step 5: Let the Pork Rest

Remove the pork from the cooker and let it rest for 10 to 15 minutes.

This allows the juices to settle.

I used to skip resting, but the meat actually stays juicier when you wait a bit.

Step 6: Pull the Meat Apart

Use two forks to shred the pork.

The meat should fall apart easily into tender strands.

If it feels tough, it likely needs more cooking time.

Good pulled pork practically shreds itself.

Adding Barbecue Sauce

After shredding the meat, mix in barbecue sauce.

Step 7: Mix Pork with Sauce

Return the shredded pork to the cooking juices.

Add about 1 cup barbecue sauce and stir.

Let the pork simmer for another 10 to 15 minutes so the sauce absorbs into the meat.

This step makes the pulled pork extra flavorful.

How to Serve Pulled Pork

Pulled pork is incredibly versatile.

There are so many ways to serve it.

Pulled Pork Sandwiches

This is the classic option.

Serve the pork on soft buns with:

Coleslaw
Pickles
Extra barbecue sauce

The crunch of coleslaw with the tender pork is perfect.

Pulled Pork Tacos

Pulled pork works beautifully in tacos.

Add toppings like:

Avocado
Fresh cilantro
Lime juice
Salsa

The flavors pair really well.

Pulled Pork Rice Bowls

Sometimes I serve pulled pork over rice with roasted vegetables.

It becomes a quick and filling dinner.

Common Mistakes I Made When Cooking Pulled Pork

Pulled pork is forgiving, but a few mistakes can ruin the texture.

Using the Wrong Cut of Pork

Lean cuts like pork loin dry out.

Always use pork shoulder.

The fat helps keep the meat juicy.

Not Cooking It Long Enough

Pulled pork needs time to break down.

If the meat is tough, it probably needs another hour or two.

Patience is key here.

Skipping the Resting Step

Letting the pork rest helps the juices stay inside the meat.

Cutting it too soon can make it dry.

Tips That Helped Me Improve My Pulled Pork

After cooking this recipe many times, a few small tips made a big difference.

Use Apple Juice for Moisture

Apple juice adds subtle sweetness that complements barbecue flavors.

It’s one of my favorite tricks.

Save the Cooking Juices

The liquid in the pot is full of flavor.

Mix some of it back into the shredded pork for extra moisture.

Don’t Overdo the Sauce

Too much barbecue sauce can overpower the pork.

I usually start with a small amount and add more later.

How to Store and Reheat Pulled Pork

Pulled pork actually tastes even better the next day.

Refrigerating Pulled Pork

Store leftovers in an airtight container in the fridge.

It keeps well for 3 to 4 days.

Freezing Pulled Pork

Pulled pork freezes beautifully.

Store it in freezer-safe bags for up to 3 months.

When reheating, add a little broth or sauce to keep it moist.

Final Thoughts on Making Pulled Pork

Pulled pork is one of those dishes that looks impressive but is surprisingly simple to make.

Once you understand the basics—good pork shoulder, slow cooking, and patience—the recipe becomes very reliable.

My early attempts were a bit rough, but after learning the importance of low heat and long cooking time, everything changed.

Now pulled pork is one of my favorite meals to cook when friends or family come over.

It’s comforting, flavorful, and incredibly satisfying.

And honestly, seeing that tender pork fall apart with a fork never gets old.

Sticky Toffee Pudding Recipe: How I Finally Mastered This Classic British Dessert

Sticky Toffee Pudding Recipe: How I Finally Mastered This Classic British Dessert

The first time I heard the name sticky toffee pudding, I imagined something overly sweet and heavy. The word sticky alone sounded like it might be too much. But then I tasted it at a small café during a rainy afternoon, and wow… that first bite completely changed my mind.

Warm sponge cake soaked in rich toffee sauce, soft dates giving it moisture, and sometimes a scoop of vanilla ice cream melting on top. It was comforting in a way few desserts are.

Of course, when I tried making it at home the first time, things didn’t go exactly as planned. My cake came out dense and the sauce turned grainy. It still tasted okay, but it definitely wasn’t that dreamy dessert I remembered.

After a few attempts and a lot of small adjustments, I finally figured out how to make a sticky toffee pudding recipe that turns out soft, rich, and perfectly saucy every time. Let me share the method that worked for me.

What Is Sticky Toffee Pudding?

Sticky toffee pudding is a classic British dessert made with a soft sponge cake that contains finely chopped dates.

The cake is baked and then covered with a warm toffee sauce made from butter, brown sugar, and cream.

Despite the name, it’s actually more like a cake than a pudding.

The magic of this dessert comes from three elements:

Moist date sponge cake
Rich caramel-like toffee sauce
Warm serving temperature

When all three come together, it’s honestly one of the most comforting desserts you can make.

Ingredients for Sticky Toffee Pudding

Before starting, it helps to gather everything so the process feels smooth.

Ingredients for the Cake

200 g pitted dates (about 1 cup chopped)
1 cup boiling water
1 teaspoon baking soda
¾ cup brown sugar
¼ cup butter (softened)
2 large eggs
1 teaspoon vanilla extract
1 ¼ cups all-purpose flour
1 teaspoon baking powder
¼ teaspoon salt

Dates are the key ingredient here. They give the cake its signature moisture and subtle caramel flavor.

The first time I made this dessert I underestimated how important the dates were. Without them, the cake just tastes like regular sponge.

Ingredients for the Toffee Sauce

½ cup butter
1 cup brown sugar
¾ cup heavy cream
1 teaspoon vanilla extract
Pinch of salt

The sauce is honestly the star of the show. It’s sweet, buttery, and rich enough to soak into the cake perfectly.

Preparing the Dates

The first step in making sticky toffee pudding is softening the dates.

Step 1: Soak the Dates

Place the chopped dates in a bowl and pour 1 cup of boiling water over them.

Then add the baking soda and stir gently.

Let this mixture sit for about 10 minutes.

The dates will soften and break down slightly, creating a thick mixture that blends easily into the batter.

The first time I skipped this step because I was impatient. Big mistake. The cake ended up with chewy date chunks instead of that smooth, moist texture.

Making the Sticky Toffee Pudding Batter

Once the dates are ready, the cake batter comes together pretty quickly.

Step 2: Cream Butter and Sugar

In a mixing bowl, cream together the butter and brown sugar.

Mix until the texture becomes light and fluffy.

This step helps create a soft sponge cake.

Sometimes I rush this step, and honestly the texture suffers when I do. Taking a minute or two extra really helps.

Step 3: Add Eggs and Vanilla

Next, beat in the eggs one at a time.

Then add the vanilla extract.

The batter should become smooth and creamy.

At this stage it already smells pretty good, which is always a nice sign.

Step 4: Mix in the Dry Ingredients

In a separate bowl, combine:

Flour
Baking powder
Salt

Gradually add the dry ingredients into the butter mixture.

Mix gently until combined.

Overmixing can make the cake dense, something I learned the hard way once.

Step 5: Add the Date Mixture

Finally, stir in the softened date mixture along with the soaking liquid.

The batter will look quite loose and slightly lumpy. That’s completely normal.

In fact, the looser batter helps create that incredibly moist cake texture.

Baking the Sticky Toffee Pudding

Once the batter is ready, it’s time to bake.

Step 6: Prepare the Baking Dish

Preheat the oven to 350°F (175°C).

Grease a medium baking dish or an 8-inch square pan.

Pour the batter evenly into the dish.

The batter may seem thin, but it thickens beautifully while baking.

Step 7: Bake the Cake

Bake for 30 to 35 minutes.

The top should turn golden brown and the center should feel firm when gently pressed.

A toothpick inserted in the center should come out mostly clean.

The smell during baking is incredible. Warm caramel and dates filling the kitchen.

Making the Toffee Sauce

While the cake bakes, it’s the perfect time to prepare the sauce.

Step 8: Melt Butter and Sugar

In a saucepan, combine butter and brown sugar over medium heat.

Stir constantly until the sugar dissolves.

The mixture should become smooth and glossy.

Step 9: Add Cream Slowly

Pour the cream in slowly while stirring.

The sauce will bubble and thicken slightly.

Then add the vanilla and a pinch of salt.

Let the sauce simmer for 2 to 3 minutes until it reaches a rich caramel consistency.

The first time I made this sauce I cooked it too long and it became overly thick. It’s better to keep it slightly runny since it thickens as it cools.

Assembling the Sticky Toffee Pudding

Now comes the most satisfying part.

Step 10: Pour Sauce Over the Warm Cake

Once the cake comes out of the oven, poke a few small holes on top with a fork.

Pour about half of the warm toffee sauce over the cake.

The sauce soaks into the sponge and makes it incredibly moist.

Reserve the remaining sauce for serving.

How to Serve Sticky Toffee Pudding

Sticky toffee pudding is best served warm.

Here are a few serving ideas I love.

With Vanilla Ice Cream

A scoop of vanilla ice cream on top of warm pudding is amazing.

The cold ice cream melts slightly into the hot toffee sauce.

It’s one of those simple dessert pairings that just works perfectly.

With Whipped Cream

Light whipped cream balances the richness of the dessert.

Sometimes I prefer this option when the pudding feels extra rich.

Extra Toffee Sauce on Top

Never be shy with the sauce.

A generous drizzle of warm toffee sauce makes the dessert even better.

Honestly, people usually ask for extra anyway.

Common Mistakes I Made When Learning This Recipe

Sticky toffee pudding is pretty forgiving, but there are a few things that can go wrong.

Using Dry or Hard Dates

Fresh, soft dates work best.

Dry dates don’t blend as smoothly and can affect the cake texture.

Overbaking the Cake

If the cake bakes too long, it loses its soft texture.

Check it around the 30-minute mark.

Cooking the Sauce Too Long

Overcooking can make the sauce too thick or slightly bitter.

Keep it gentle and stir constantly.

Tips That Helped Me Perfect This Dessert

After making sticky toffee pudding several times, a few small tricks improved the results.

Use Dark Brown Sugar

Dark brown sugar gives the sauce deeper caramel flavor.

The difference is small but noticeable.

Serve the Cake Warm

Sticky toffee pudding tastes best when warm.

If reheating leftovers, microwave a slice for about 20 seconds.

Let the Sauce Soak Into the Cake

Pouring sauce over the cake right after baking allows it to absorb into the sponge.

This creates that classic sticky texture.

Final Thoughts on Making Sticky Toffee Pudding

Sticky toffee pudding might sound fancy, but the recipe itself is surprisingly simple.

The combination of soft date cake and warm toffee sauce creates a dessert that feels comforting and indulgent at the same time.

My early attempts were far from perfect, but once I understood the key steps—softening the dates, mixing gently, and making a good sauce—the recipe became reliable.

Now it’s one of those desserts I make when I want something that feels special but still approachable.

And honestly, watching that warm toffee sauce soak into the cake never gets old.

Ridiculous Revel Bars Recipe: If Oatmeal Cookies, Fudge & Brownies Had a Baby | Desserts

Ridiculous Revel Bars Recipe: If Oatmeal Cookies, Fudge & Brownies Had a Baby | Desserts


What’s a revel bar? A revel bar is an oatmeal cookie bar that has a chocolatey, fudgy filling in the middle. I think it’s more like if brownies, fudge and oatmeal cookies had a sweet delicious baby. It’s said these bars are called revel bars because people revel in delight after eating them. I definitely believe that!


The oatmeal cookie layer is made with butter, brown sugar, eggs, vanilla, quick oats, flour, baking soda and a pinch of salt. The batter is used as the base of the bars and as the crumble topping. The chocolate layer is made with sweetened condensed milk, chocolate chips, butter, salt, vanilla and chopped nuts.

<Macro 'tip'>


You can use your favorite chocolate chips for this
dessert recipe, but semisweet are my favorite. Make these cookie bars gluten-free by using gluten-free flour. If you don’t like nuts, leave them out! If you do use nuts and have the time, give them a quick toast in a dry skillet to bring out even more flavor.


Cuisine: American

Prep Time: 10 minutes

Cook Time: 35 minutes


Total Time: 45 minutes


Servings: 12+


Ingredients


Oatmeal Bar


  • 1 cup (2 sticks) butter, softened
  • 2 cups packed brown sugar 
  • 2 eggs, at room temperature
  • 2 teaspoons vanilla
  • 3 cups quick oats
  • 2 1/2 cups flour
  • 1 teaspoon baking soda
  • big pinch of salt


Filling


  • 1 can (14 ounces) sweetened condensed milk
  • 1 bag (12 ounces) chocolate chips
  • 3 tablespoons butter
  • 1 teaspoon salt
  • 2 teaspoons vanilla 
  • 1/3 cup chopped pecans or walnuts


Here’s how to make it: 


  1. Cream the butter and brown sugar together with an electric mixer. Add the eggs and vanilla. Mix well. Stir in the baking soda, salt, oats and flour until combined. Put about 2/3 of the mixture into a greased 13×9-inch baking pan. Press down to cover the bottom of the pan. 
  2. To make the chocolate layer, put the sweetened condensed milk, chocolate chips, butter and salt into a saucepot. Cook over low heat, stirring, until smooth. Stir in the vanilla and nuts. Remove from the heat. Spoon the filling over the oatmeal layer, spreading to cover the entire top. 
  3. Sprinkle the remaining 1/3 oatmeal mixture over the top. 
  4. Bake in a preheated 350-degree F oven for about 30 minutes or until the top is golden brown. 


Note: 30Seconds is a participant in the Amazon affiliate advertising program and this post contains affiliate links, which means we may earn a commission or fees if you make a purchase via those links.


Recipe cooking times and servings are approximate. Need to convert cooking and baking measurements? Here are some kitchen conversion charts. Here’s how to submit your recipes to 30Seconds.


Take 30 seconds and join the 30Seconds community, and follow us on Facebook to get recipes in your newsfeed daily.


Related Products on Amazon We Think You May Like:

30Second Mobile, Inc. is a participant in the Amazon Services LLC Associates Program, an affiliate advertising program designed to provide a means for us to earn fees by linking to Amazon.com and affiliated sites.

Abra Berens’ Strawberry Sundae Recipe Review

Abra Berens’ Strawberry Sundae Recipe Review

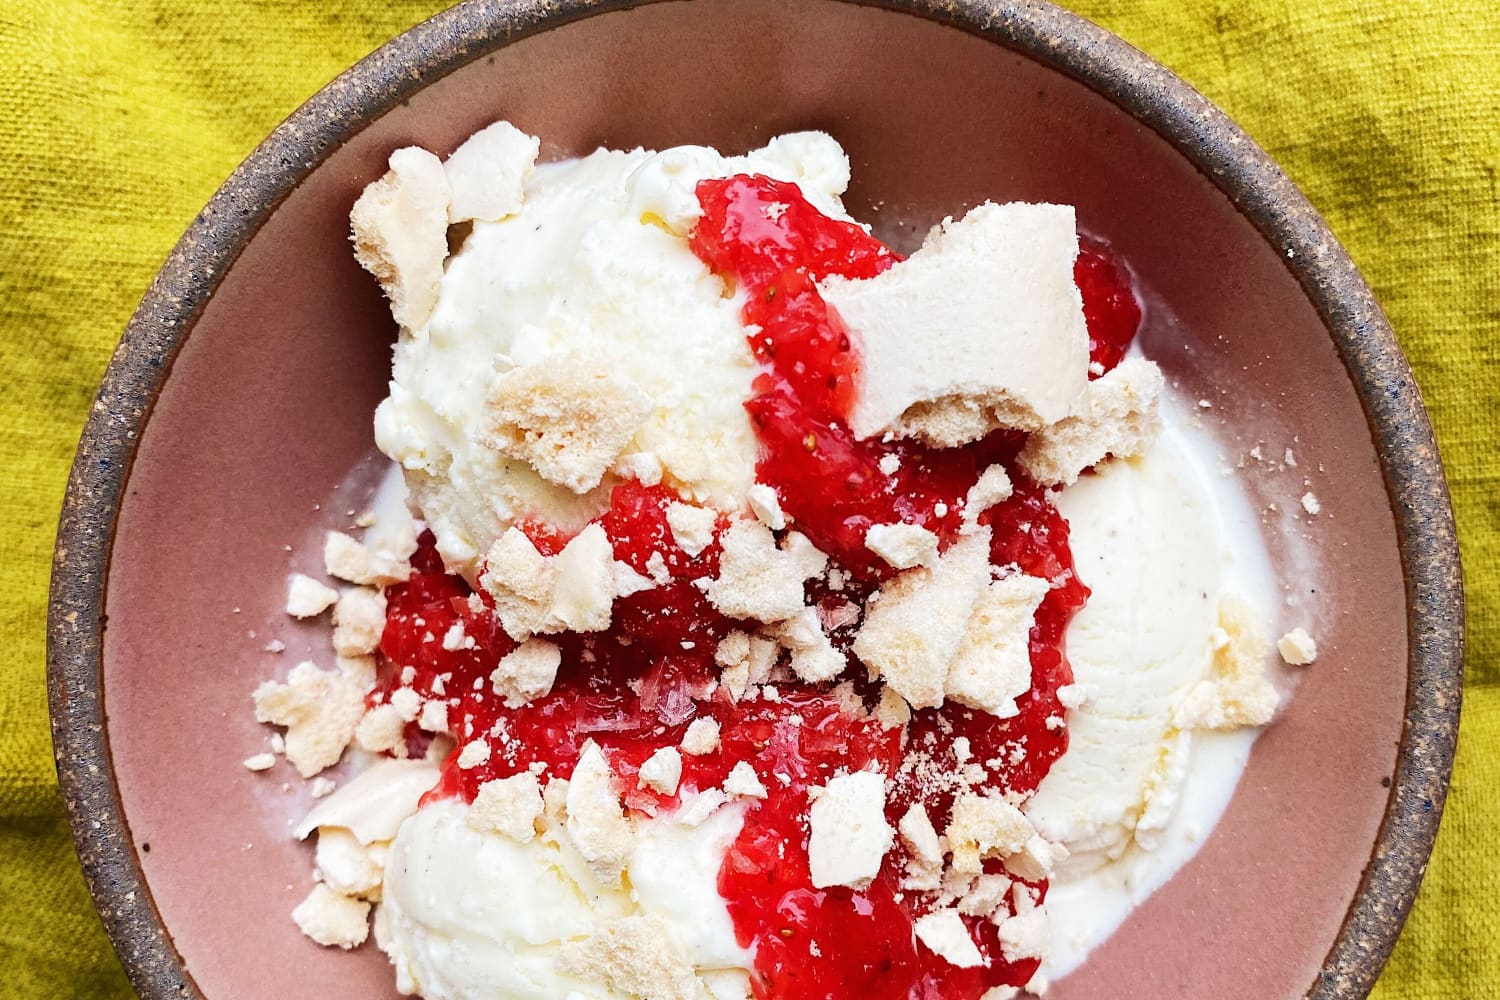
This easy yet elegant sundae features vanilla ice cream, in-season strawberries, and homemade meringue.

Makes4 sundaes

We independently select these products—if you buy from one of our links, we may earn a commission. All prices were accurate at the time of publishing.

I have a major sweet tooth, and I love to bake year-round. But my favorite time to enjoy sweet treats is, hands-down, spring and summer. With the influx of seasonal goodies like strawberries, rhubarb, and peaches, my desserts become bright, vibrant, sweet, and juicy. This affinity for fruit-based sweets led me straight to author and chef Abra Berens’ newest cookbook, Pulp: A Practical Guide to Cooking with Fruit.

Pulp explores fruit’s place in both sweet and savory cooking, with recipes like Roast Chicken over Blueberries, Cornbread + Lemon and Rum-Plum Clafoutis. But the one that immediately caught my eye was the Strawberry Sundae recipe. With creamy vanilla ice cream, crunchy meringues, sweet strawberry sauce, and flaky salt, this dessert seemed both impressive and approachable.

Why I Love This Strawberry Sundae

The first thing I noticed is that this recipe meets you where you are. While there are instructions for making all three components — ice cream, strawberry sauce, and meringue — from scratch, it’s the combination of ingredients that makes this recipe so special. So if you’re not really a baker, but you love making homemade ice cream, you could buy some vanilla meringues from your local grocery store or bakery. If you don’t have an ice cream maker, like me, then you can buy your favorite vanilla ice cream. I love that if you have a pint of ice cream in the freezer, some meringues in your pantry, and the strawberry sauce in your fridge, you can assemble this showstopping dessert in a matter of minutes — it’s perfect for dinner parties, or for the guest who stops by on short notice.

I grabbed my favorite Van Leeuwen vanilla ice cream, then set out to make my meringues. The meringue “batter” came together quickly and easily in my stand mixer. After the two-hour bake time at 250°F, my meringues were crunchy on the outside and slightly marshmallowy on the inside, albeit a little darker than I prefer.

The strawberry sauce was also so simple to put together. After hulling two pounds of strawberries, I dumped them in the food processor with a tablespoon of sugar and blitzed it until “coarsely chopped,” as instructed. Mine came out looking a little bit like strawberry salsa, but the flavor was spot-on — even with grocery-store strawberries. I can’t wait to try this with tender, fragrant farmers market strawberries in the coming months.

When it was time to assemble, I scooped some of the ice cream into a bowl, drizzled over some strawberry sauce, and topped with some crushed meringue and a pinch of flaky salt. When I took a bite, the salt hit my tongue first and then quickly gave way to the ice cream and strawberries, which evoked memories of my favorite childhood drink, Nesquik Strawberry Milk, in the best way possible. The crunchy meringues gave the perfect textural contrast, and lended a bit more sweetness to balance the salt. This is a truly impressive dessert that just so happens to be gluten-free.

In the headnotes, Abra shares the inspiration behind the recipe: “Through most of June, my favorite dessert is a bowl full of hulled strawberries, splashed with heavy cream, a spoonful of sugar, and a sprinkle of the coarsest salt.” I would say her ode to this combination more than lived up to its inspiration.

If You’re Making This Strawberry Sundae, a Few Tips