
Claire Ptak’s baking recipes: ‘I’m a total cake for breakfast person’ | Baking

Claire Ptak’s baking recipes: ‘I’m a total cake for breakfast person’ | Baking

When I’m thinking up recipes, I’m trying to satisfy a craving,” says Claire Ptak, founder of Violet Cakes in east London. Her command of flavours and textures and the outright beauty of her creations has made her one of London’s best-loved bakers, sought after by Hackney residents and royalty alike. But the craving comes first. “In the mornings, it’s cake,” she says. “I’m a total cake-for-breakfast person, donuts too.”

Her new book, Love is a Pink Cake, was originally going to be a seasonal baking manual, requiring photoshoots for each season, but Covid restrictions got in the way so Ptak simplified it and made it more personal. Now the book is divided between London, where she has lived since 2005, and northern California, where she was born and raised.

“We’d always be in the woods looking for mushrooms and wild berries,” she recalls of her childhood in the small, arty town of Inverness, north of San Francisco. Her parents were good cooks and Ptak adored baking from a young age, though for a long time she wanted to become a film-maker. An encounter with a pastry chef from Chez Panisse changed her mind and she landed a job at the renowned Berkeley restaurant, baking wild huckleberry tartlets for her interview.

Three years later she moved to London and set up Violet, which began as a cake stall on Broadway Market before graduating to a nearby building in 2010. When she first arrived, Ptak would make “lots of Christmassy things – cakes, puddings, mince pies – and desserts like trifle and posset. They really blew me away, I thought they were incredible.”

Claire Ptak and her daughter Frances.
Claire Ptak and her daughter Frances. Photograph: Pia Riverola

Later, she went back to her roots and embraced a more Californian approach, but with British ingredients. “There’s a slightly lighter touch with certain things,” she says of her style of baking. Seasonality and freshness are important too, as is preserving the integrity of the ingredients – making them “taste more like themselves” by playing with flavours and textures, and lifting them with salts, sugars, acids and fats.

She loved shooting the Californian half of the book over a balmy week in August 2021 at the wood-cabin home of the late sculptor JB Blunk, the father of a childhood friend, but she’s always happy to come back to London. Her love of British baking is still evident in recipes for brown sugar victoria sponge and treacle tart.

The most involved recipe in the book is also her best known. In 2018, Meghan Markle and Prince Harry hired Ptak to bake their wedding cake. She gave them six options and they chose the lemon and elderflower one. “I really loved doing that,” she says. “I felt a real down-to-earth rapport with them. And I thank them very much because my business definitely quadrupled.”

At the heart of Ptak’s book is the idea that baking is an act of love. “I do think that’s true,” she says. “You put so much of yourself into baking something, even if it’s a batch of cookies that takes half an hour. It’s such a caring, thoughtful thing to do. Cake is such a positive thing.”

On measurements
At Violet we weigh everything, including liquids. I suggest you do this at home, too. If you haven’t got one already, invest in a small set of digital kitchen scales.

Chocolate hazelnut cake

Chocolate hazelnut cake.
Chocolate hazelnut cake. Photograph: Maren Caruso

This is inspired by my favourite cake at the River Cafe. My friend Ruthie Rogers (the restaurant’s cofounder) always makes each guest feel like the most important person in the room. When I first moved to London, I tried to get a job at her restaurant but, at the time, they didn’t have a pastry team, so I ended up answering phones. When the other cofounder, Rose Gray, saw me she asked what the hell I was doing there – not only was I terrible at phones, but I belonged in the kitchen. Now, 18 years later, they have a full pastry team, and I tease Ruthie that I should apply for a job.

Serves 8
whole hazelnuts 250g, skins on
dark chocolate 250g
unsalted butter 250g
eggs 6, at room temperature
fine sea salt ½ tsp
caster sugar 250g
flaky sea salt ¼ tsp, for top
creme fraiche or whipped cream to serve

Preheat the oven to 150C fan/gas mark 3½ and grease and line a 20cm cake tin with baking paper.

I recommend using whole hazelnuts with the skins on and going through the process of toasting and removing the skins yourself. You can buy toasted blanched hazelnuts but the flavour is inferior as they deteriorate much quicker once toasted and so inevitably taste slightly stale. Toast the hazelnuts on a baking tray until deep golden and the skins are cracking off – about 15 minutes. (Watch they don’t burn as this will spoil the flavour of the cake.)

Remove the nuts from the oven and turn them out on to a clean tea towel. Bring up the sides of the towel to make a little satchel and rub the nuts together to slough off the skins as much as possible. Open the cloth up and carefully lift out the toasted nuts, leaving behind as much of the skins as possible. Place the skinned toasted nuts into a food processor and blitz until roughly chopped but not a powder. Set aside.

In a heatproof bowl set over a pot of simmering water (make sure the bottom of the bowl is not touching the water), melt the chocolate and butter, stirring occasionally. Once melted, remove from the heat and allow to cool slightly, but keep away from draughts.

Meanwhile, in the bowl of a stand mixer fitted with the whisk attachment, whip up the eggs and fine sea salt until frothy, then slowly add the sugar in a couple of batches. Whip until fluffy and voluminous.

Stir the chopped hazelnuts into the melted chocolate and butter mixture. Finally, fold in the whipped eggs and sugar. Pour into the prepared cake tin and sprinkle the top with the flaky sea salt. Bake for 30 minutes until set but not dry. You want the centre to be a little wobbly and gooey; it will continue to bake and set as it cools, so don’t look for a clean skewer test here. Cool for at least an hour before cutting and serving with the creme fraiche or softly whipped cream.

Raspberries baked in muscat sabayon

Raspberries baked in muscat sabayon.
Raspberries baked in muscat sabayon. Photograph: Pia Riverola

Make sure to buy a good sweet wine as it is the basis of the flavour in this delicate dessert. It’s super fast to make but really can’t be made ahead of time, so pour your guests another drink, excuse yourself from the table and get to work. It should only take about 15 minutes all together.

Serves 4
muscat wine 8 tbsp (beaumes de venise or another sweet dessert wine, such as sauternes)
caster sugar 6 tbsp
egg yolks 6
raspberries 400g

Baker’s tip: never leave egg yolks and sugar sitting in the same bowl before whisking as the acidity of the sugar can burn the yolks and make them grainy. Always combine the ingredients just before whisking and then use straight away.

Get a medium-sized ovenproof gratin dish ready.

Pour the wine and half the sugar into a small, heavy-based saucepan and heat gently until reduced by half. This should take about 10 minutes. Set aside but keep warm.

Place the egg yolks and remaining sugar in the bowl of a stand mixer and whisk until thick and leaving a ribbon trail. Remove from the mixer, then temper them by adding just a few tablespoons of the warm wine mixture and whisking until smooth. Whisk in the remaining wine, being careful not to cook the eggs.

If your mixing bowl is heatproof use it for the next step; or transfer the mixture to a heatproof bowl and place it over a small saucepan of barely simmering water, making sure the base of the bowl doesn’t touch the water. Whisk until the mixture is beginning to thicken and is light and foamy.

Meanwhile preheat the grill to high. Pour the mixture into your gratin dish and scatter the raspberries over the top, then place under the hot grill for a couple of minutes to brown. Serve at once.

Brown sugar victoria sponge

Brown sugar victoria sponge.
Brown sugar victoria sponge. Photograph: Pia Riverola

This golden brown, less refined version of victoria sponge has a wonderful texture. I love it with my quick strawberry jam – strawberries and brown sugar are very good friends. A layer of whipped, unsweetened cream in the middle balances out the cake perfectly.

Serves 8-10
For the quick strawberry jam
strawberries 250g, hulled and quartered (cut smaller if the berries are very large)
demerara or raw sugar 225g
lemon juice of 1
salt a pinch

For the sponge
unsalted butter 250g, at room temperature
brown sugar 250g
eggs 4
plain flour 250g
baking powder 1 tbsp
salt ½ tsp

To assemble
quick strawberry jam 150g
double cream 230g
icing sugar for dusting

First make the jam. Put 125g of the strawberries with half of the demerara sugar in a small heavy-bottomed pot and crush with a potato masher (or similar) while warming through over a low heat.

Preheat the oven to 180C fan/gas mark 6 and line a roasting tin with baking paper. Put the remaining demerara sugar in the lined roasting tin and bake in the oven for 10-15 minutes to warm through.

Add the remaining strawberries to the crushed ones, bring it just to a simmer, then add the warm sugar. The warm sugar keeps the cooking going swiftly so the fruit cooks as quickly as possible, preserving that fresh fruit taste. Stir until the sugar dissolves, then add the lemon juice and pinch of salt. Bring to the boil and allow to bubble away for 12-15 minutes. Cool completely (any leftovers after the cake has been assembled will keep for two weeks).

Preheat the oven to 150C fan/gas mark 3½, and grease and line two 20cm cake tins with baking paper.

For the sponge, in the bowl of a stand mixer fitted with the paddle attachment, cream the butter and sugar together until pale and fluffy. Add the eggs one at a time, beating between each addition and scraping down the sides of the bowl as needed.

Whisk the flour, baking powder and salt together, then add this to the mixer and continue to mix just until incorporated.

Divide the mixture evenly between the prepared cake tins, then bake on the middle shelf of the oven for 25-30 minutes, or until a skewer inserted in the centre comes out clean. Leave to cool in the tins before turning out.

Once the cakes are cool, spread one cake with 150g of the cooled jam. Whip the cream to soft peaks and spoon on top of the jam, then top with the second cake layer. Dust with icing sugar. Chill until ready to serve to keep the cream nice and fresh.

Vegan chocolate chip cookies

Vegan chocolate chip cookies.
Vegan chocolate chip cookies. Photograph: Maren Caruso

A chewy, gooey chocolate chip cookie that is totally plant-based and totally delicious. I wanted to create a cookie for our vegan friends that was as good as our beloved egg-yolk chocolate chip cookies. In other words, a cookie for vegans with plenty of sugar and white flour. Not all vegans want healthy bakes, so this one is for them.

Makes 18 cookies
ground flaxseeds 1 tbsp
oat milk 60g
plain flour 455g
rolled oats 60g
baking powder 1¼ tsp
bicarbonate of soda 1 tsp
fine sea salt 1 tsp
plant-based butter 250g
soft light brown sugar 250g
caster sugar 150g
vanilla extract 1 tsp
vegan chocolate 250g, broken into 1cm pieces
flaky sea salt to finish

Soak the ground flaxseeds in the oat milk and set aside.

Whisk together the flour, oats, baking powder, bicarb and salt in a bowl and set aside.

In the bowl of a stand mixer fitted with the paddle attachment, beat the vegan butter and both sugars until creamy. Beat in the flax mixture and the vanilla, then add the dry ingredients and mix until just combined. Finally, add the chocolate and mix once again.

Use an ice-cream scoop to portion out 18 cookies on to a tray, or form golf-ball sized amounts of cookie dough using 2 tablespoons. Chill or freeze for at least 1 hour. (You can store the unbaked cookies in the freezer and bake as needed.)

When ready to bake, preheat the oven to 170C fan/gas mark 5. Line 1 or 2 large baking sheets with baking paper and arrange the dough evenly on the trays, leaving enough space between each one so they have room to expand during baking (they almost double in size). If you are baking from frozen, allow the cookies 5 minutes out of the freezer before placing in the oven.

Sprinkle a few flakes of sea salt over the top of each cookie, then bake for 12-14 minutes until the centre of each cookie is slightly soft and underbaked but the edges are crisp and golden. Remove from the oven and allow to cool on the tray for 10 minutes before eating.

Treacle tart with whipped cream

Treacle tart with whipped cream.
Treacle tart with whipped cream. Photograph: Pia Riverola

The first time I tasted this very British dessert was at St John Bread and Wine almost 20 years ago. It’s very rich but fantastic. I love the chewy texture and the hint of lemon in the butterscotch-y filling. I add a dash of vodka to mine in order to cut the sweetness down a little. You can play with the citrus here and use mandarin, meyer lemon, or even lime. I have tried to make it with various types of bread – sourdough is a no-no. I love it best with a pain de mie.

Serves 8
For the pastry
plain flour 140g
fine sea salt ⅛ tsp
caster sugar ½ tsp
unsalted butter 115g, chilled and diced
iced water 2 tbsp

For the filling
fresh breadcrumbs 200g, from a slightly stale loaf of white bread
golden syrup 800g
lemon, lime, orange or mandarin juice of 1 large
vanilla extract 2 tsp
vodka 1 tbsp (optional)
flaky sea salt ½ tsp
unsweetened whipped cream to serve

Grease a 25cm loose-bottomed tart tin. Put the flour, salt and sugar into a food processor and blitz to combine. Add the cold butter and pulse until it resembles coarse breadcrumbs. Drizzle in the iced water (you may not need it all) just until it comes together into a ball. Press the dough into a disc, wrap in clingfilm and chill in the fridge for 20 minutes.

Lightly flour a work surface and turn the dough out on to it. Roll it out into a 28cm circle. Carefully lift and lower this into the tart tin, pressing it gently to line the base and sides of the tin. Trim off any excess dough, then chill in the fridge or freezer for at least 30 minutes, or until ready to use.

Meanwhile, prepare the filling. Tip the breadcrumbs into a large bowl, add the remaining ingredients and stir well. Set aside to allow the bread to soak up the syrup. Meanwhile, preheat the oven to 180C fan/gas mark 6.

When ready to bake, loosely cover the case with a piece of baking paper and fill with ceramic baking beans or dried beans. Bake for 15 minutes, then remove the paper and beans and return to the oven for another 10 minutes until the pastry is golden brown.

Tip the filling into the hot tart case; it should come near to the edge of the pastry. Cook for a further 25-30 minutes until the filling has set and turned a light toffee shade. Allow the tart to cool before removing from the tin. Serve with unsweetened whipped cream.

Love is a Pink Cake by Claire Ptak (Vintage Publishing, £27). To support the Guardian and Observer, order your copy atguardianbookshop.com. Delivery charges may apply.

Easy cooking tips to keep your heart healthy

Easy cooking tips to keep your heart healthy

A heart-healthy diet is likely to bring to mind images of food that`s boiled and bland. On the contrary, a heart-healthy diet is one that is interesting, flavourful, and colourful as it should include an abundance of deep-colored veggies and fruits, coarse grains like millets, legumes of all kinds (soy, nuts, and seeds), low-fat dairy, along with some portions of fish or poultry.

Among all the foods required to keep the heart healthy, the ones that are eaten in far less quantity than recommended are vegetables and fruit.

This is a matter of concern that has been highlighted in various reports like “What India Eats” by ICMR-NIN, 2020. A heart-friendly diet must include at least five servings per day of this food group.

Other than eating diverse ingredients, the cooking process also plays a role in terms of the taste, texture, colour, digestibility, absorption, and nutritive value of the dish.

“Preferred cooking methods such as stewing (cooking in a covered pan using a small quantity of liquid that is simmering) and steaming (surrounding the food with steam produced by boiling water) score well. Among the methods of frying – stir-frying or sauteing (tossing food in a small amount of fat in a frying pan) is acceptable and healthy,” says Neelanjana Singh, a dietitian and wellness consultant.

“Even though each of the cooking methods has its set of advantages and limitations, it`s useful to remember these overarching guidelines for ideal heart health,” Neelanjana tells IANSlife:

Short cooking time: Overcooking should always be avoided, no matter what the cooking method. Overcooking destroys the nutrients as well as colours and textures of the food. Methods that employ shorter cooking time is preferred – pressure cooking and microwaving are prime examples.

Minimal use of water: When cooking in water, use as little as needed. This will minimise the leaching out of water-soluble nutrients. Try to use the leftover water in a sauce or gravy. Also, avoid adding baking soda to veggies when cooking. They may retain the colour but the Vitamin C content drops.

Avoid very high temperatures: This is particularly important in the case of dry heat methods like grilling, baking, broiling, and frying. Cooking at very high temperatures (above 180 degrees Celsius) can form acrylamide, a compound that has been linked to cancers, diabetes, and heart disease. The fat dripping onto the meats/paneer/potatoes at high temperatures causes such chemicals to form.

Use multi-source cooking oil: One of the most commonly asked questions about diet pertains to cooking oils and which of these is the best for our health. Multi-source cooking oils have the added advantage of low-absorbance technology and better heat stability, which is desirable for high-temperature cooking methods like baking and frying. Fried foods are very much part of our celebratory menus, which we can enjoy occasionally in limited portions, without increasing the risk of disease.

This brings us back to the fact that diet can play a big role in preventing disease conditions. The importance of using ingredients that are minimally processed and nutrient-dense cannot be overemphasized.

While the focus of a heart-friendly diet is on what we should do but being cognisant of the don`ts is crucial too. Excess salt, sugar, and saturated fat should be on the `watch out for` list. Trans fats, ultra-processed foods, and processed meats fall in the category of `to avoid` foods.

All in all, the dietary choices you make can go a long way in preventing not only heart disease but many other chronic conditions.

Cooking Tips: How To Make Crispy Banana Chips (Easy Recipe Inside)

Cooking Tips: How To Make Crispy Banana Chips (Easy Recipe Inside)

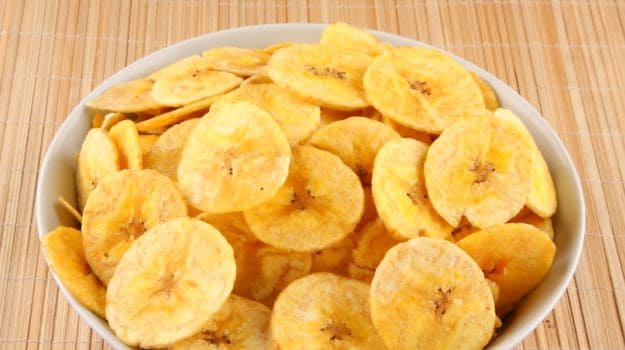
Crispy, flavourful and simply delicious, chips are something that no one can resist biting on. Be it in the evening with a cup of hot chai or at night while binge-watching your favourite show, they always come to our rescue whenever we crave something salty and crunchy. While you’ll find a wide variety of chips in the market, nothing defines comfort best than gorging on some homemade desi munchies. Speaking of desi snacks, banana chips are one such snack that are quite popular in South India. This yummy snack is known for its thin and crispy texture, and makes for a delicious snack to munch on. 

Also read: 5 Best Chips Recipes To Prepare At Home: Potato Chips, Banana Chips & More

These crispy delights are made from raw unripe bananas and are deep-fried until golden in colour. They can be sweet or savoury in flavour, and are often seasoned with masalas such as red chilli powder and black pepper. While most of us prefer buying this South Indian snack from the market, it’s best to make fresh banana chips at home. Now you may think that making banana chips from scratch requires a lot of time and effort. But what if we tell you that you can easily make this yummy snack at home? Here we bring a simple banana chips recipe that’ll ensure that they turn out to be super crispy.  

cjiru6do

Here’re Some Tips To Make Crispy Banana Chips At Home: 

1. Use The Right Type Of Bananas

Using the right type of bananas helps in ensuring that your banana chips turn out to be crispy. Opt for firm and unripe bananas as they have a low sugar content. If possible, try to get your hands on starchier banana varieties like the Nendran and Saba cultivars.  

2. Slice Them Thinly 

The next thing to keep in mind while making banana chips is to slice them thinly. Make sure that they are sliced uniformly, as this allows them to cook evenly. The thinner your banana chips are, the crisper they will be.

3. Soak Them In Salt Water 

Once you’ve sliced the bananas, soak them in a bowl of salted water for a few minutes. This helps in removing excess starch from the bananas and prevents them from sticking together while frying.  

Also read: Bored of Potato Chips? 5 Unique And Delicious Chips Recipes You Should Try At Home

banana chips

Crispy Banana Chips Recipe: How To Make Crispy Banana Chips 

To begin with, add banana slices, salt and turmeric in a bowl and let it set for around 4-5 minutes. Now, give it a good mix and transfer to a colander to drain completely. Heat some coconut oil in a kadhai set on medium flame.  

Add the banana slices in small batches and fry until crispy and golden in colour. Once done, transfer onto a paper napkin. Sprinkle some salt and red chilli powder on top and allow them to cool. Store in an air-tight container for up to a week. Serve and enjoy! 

For the complete recipe of crispy banana chips, click here. 

Try out this recipe and let us know how it worked for you in the comments section below. If you’re looking for more South Indian snacks, click here for some of our best recipes. 

Cooking Tips: How To Make Perfect Rajasthani Bati At Home

Cooking Tips: How To Make Perfect Rajasthani Bati At Home

Bati is a popular Rajasthani bread made using whole wheat flour and ghee. Crispy from the outside and soft from the inside, this quintessential Rajasthani delicacy is an absolute delight to eat. It is typically served with dal, chutney, churma, and topped with a generous drizzle of ghee. Made using local ingredients, bati is quite flavourful and has a unique texture. However, making it at home can be quite challenging. Did your bati turn out to be too soft or too hard? If you’re someone who often faces this problem, we’ve got you covered. While it may take some practice to perfect the art of making this Rajasthani bread, here are some easy tips that’ll come in handy the next time you struggle to make bati at home.

Also read: Rajasthani Dal Bati Recipe Will Give Your Weekend Meal A Royal Makeover

dal bati

Do you often find yourself wondering?…

Why Is My Bati So Hard?

Bati tastes best when it is neither too soft nor too hard. Your bati may turn out to be hard if you fry it for a longer period of time. There are chances of over-frying, and this could easily make it harder from the inside.

What Are The Types Of Bati?

This Rajasthani bread can be relished as is or stuffed with various fillings. You can stuff it with peas, onions, potatoes or even sattu.

Who Invented Bati?

According to studies, it is believed that bati was invented by the founder of the kingdom of Mewar – Bappa Rawal. Back then, it was their preferred war-time meal. 

Also read: 11 Sumptous Rajasthani Recipes | Popular Rajasthani Recipes

5b5kmht

Here Are Some Tips To Make Perfect Rajasthani Bati At Home:

1. Knead The Dough Well

Kneading the dough well is the first step in ensuring that your batis turns out to be of the right texture. If you knead the dough too smoothly, it will ruin the crispness of the batis. Always knead a firm dough instead of a smooth one as this allows them to retain their shape.

2. Bake It

Batis are traditionally cooked in a tandoor. However, since most of us do not have access to a tandoor, it’s best to bake them. While some people also choose to fry them, there are high chances that you might over-fry them. Baking is much simpler and allows you to check the hardness of the batis.

3. Add Loads Of Ghee

Ghee is something that you simply cannot compromise on while making batis. It gives them a rich flavour and helps enhance their taste. Make sure to rub the dough with enough ghee instead of water.

4. Add Yogurt

Another ingredient that can help you make perfect batis at home is yogurt. While kneading the dough, you can add 1-2 tsp of yogurt along with the ghee. This too helps in enhancing the flavour of the batis.

Try these tips and let us know how they worked for you in the comments below.

About Vaishali KapilaVaishali finds comfort in eating parathas and rajma chawal but is equally enthusiastic about exploring different cuisines. When she’s not eating or baking, you can often find her curled up on the couch watching her favourite TV show – FRIENDS.

Indian Cooking Tips: How To Make Soft And Fluffy Poha

Indian Cooking Tips: How To Make Soft And Fluffy Poha

Poha is one of the most popular Indian breakfast dishes. Made with flattened rice that is steamed and cooked with a wide variety of veggies and masalas, poha never fails to disappoint our taste buds. The best part about this dish is that it is super light on the stomach and has a number of variants in different parts of the country. Be it the classic Indori poha,Maharashtrian kanda poha or Nagpuri tarri poha, they all taste equally divine! Now, it may seem easy to make poha at home but it is also something that can go wrong very quickly. Poha tastes best when it is super soft and fluffy, and achieving this consistency at home can be quite challenging. To help you make the perfect poha, we have jotted down some easy tips that’ll definitely come in handy the next time you decide to make this dish at home. Take a look.

Also read: Want To Lose Weight? Try This Protein-Rich Poha For Your Next Breakfast

g3itoj8g

Here’re Some Tips To Make Soft And Fluffy Poha At Home:

1. Rinse The Poha Nicely

The first thing to keep in mind while making poha is to wash it thoroughly. The best way to do this is by rinsing it under running water. Once done, squeeze out all the excess water using a strainer and allow it to dry.

2. Don’t Soak It For Too Long

Once you’ve rinsed the poha, it’s time to soak it in water. However, make sure to soak it only for a few minutes as soaking it for an extended period of time could end up ruining its texture. This would also make the poha extra soggy, and this is something we certainly do not want.

3. Fluff The Poha

Another tip that works like wonders while making poha is to gently fluff it with your hands before cooking. This helps in separating the grains and making the poha less clumpy and mushy. You could also use a fork to fluff the poha.

Also read: Different States, Different Specialities: 5 Poha Recipes From Across India To Spruce Up Your Breakfast

i5qnhn2

4. Cook On Low Flame

Another common mistake that most of us make while making poha is cooking it on medium-high flame. Overcooking the poha can end up making it super dry and hard. In order to retain its moisture, cook it only for a few minutes for the best results.

5. Add A Dash Of Milk Or Lemon Juice

Lastly, if your poha is still a bit dry, you can add a dash of milk or lemon juice. Adding milk or lemon can help add moisture to the poha while enhancing its flavour. Make sure to add either of these ingredients only after switching off the gas. Cover it with a lid for 4-5 minutes for an extra layer of moistness.

So, the next time you make poha at home, keep these tips in mind! Happy Cooking!
 

About Vaishali KapilaVaishali finds comfort in eating parathas and rajma chawal but is equally enthusiastic about exploring different cuisines. When she’s not eating or baking, you can often find her curled up on the couch watching her favourite TV show – FRIENDS.

Watch: Secret Tips To Make Perfectly Crispy Aloo Chips That Will Last A Year

Watch: Secret Tips To Make Perfectly Crispy Aloo Chips That Will Last A Year

Whether it is for evening snacking, or late-night munching paired with meals like sandwiches, aloo chips stand out as the preferred option. Homemade aloo chips are commonly seen in Indian households as they offer the same crunch and saltiness, minus the preservatives. But one problem that all home chefs face is that the chips turn black, soggy and unpalatable sooner than expected. Do you also face a similar issue? You are going to thank us for these superb tips that we dug out for you to make long-lasting aloo chips at home.  

In a video posted on the YouTube channel ‘Cooking With Reshu’, we found out some great hacks to make the perfect homemade aloo chips that don’t turn black and remain crispy for a long time. We listed down the recipe with tips for you here.  

(Also Read: Indian Cooking Tips: How To Make Street-Style Crispy And Khasta Samosa)

4931enn

You can easily make aloo chips at home. Image Credit: iStock

How To Make Crispy Aloo Chips I Homemade Aloo Chips Recipe  

1. First, take large-sized potatoes. Wash and peel them and put them in water. This ensures that the potatoes don’t turn black when cooked. Then cut them into round slices.   

Tip: After cutting the slices, immediately put them in water. This is also an important step to prevent the blackening of the chips later.  

2. Now wash all the slices in water.  

Tip: Wash thoroughly 2-3 times. This removes the starch from the potatoes and lengthens their life. With low starch content, the chips will retain shape for a long time. 

3. Now boil some water and add salt to it. When the water starts boiling, add the raw potato slices and cook with the lid closed.  

Tip: The water should be fully boiling when you put the chips, the slices may cook unevenly otherwise. If you put slices in cold or par-boiling water, some of the chips will dunk to the bottom of the vessel and will cook later than others. 

4. Boil the slices for 5-7 minutes, not more than that.   

Tip: Keep shuffling and turning the slices so that all the slices cook evenly at the same time. Take a ladle and keep turning the slices after a minute so that both the sides of the chips get heat from the gas. 

5. When foam forms in the water, take it as a sign that the slices are cooked.   

Tip: Another way to know if the slices are cooked is that the ends slightly curl inwards. The chips should be crispy and should not break when touched.  

6. Take off the slices from the gas, drain the water through a strainer and dry in the sun for 1-2 days.  

Tip: Sun-drying is a long process but it gives an everlasting crispiness to the chips. If the weather is sunny, one day should be enough or else it may take up to 3 days too. Check if the chips have hardened to know they are dried enough.  

7. Store these chips and fry them whenever you want to consume them.   

Also Read: 5 Tricks To Make Perfect Street-Style Aloo Tikki

Try this recipe and these tips to make the perfect homemade potato chips. Watch the complete recipe video here:  

Featured Video Of The Day

Cooking Beyond Boundaries: Chef Gaggan Anand In Conversation With Gargi Rawat